1. How to Fix Internal Server Error #
Perhaps the most confusing WordPress error that a beginner may come across is “Internal Server Error”, or sometimes “500 Internal Server Error”. This error usually appears when there is something wrong, but the server is unable to identify where the problem is. Since the error message does not indicate where you should look for the error, it is pretty much up to you to figure this out. We have compiled a list of solutions that you can try and one of them will help you resolve it. See
1.Clear WordPress and Browser Cache #
Browsers and your WordPress caching plugins can sometimes mistakenly store a cached copy of an error page.
The easiest way to fix this is by first clearing your browser cache.

2. This Site is Experiencing Technical Difficulties #

WordPress introduced a fatal error protection feature in WordPress 5.2. This feature displays a simple error message stating that “This site is experiencing technical difficulties”.
For full details, WordPress then sends an email notification on your WordPress admin email address. This email message contains a link to access the backend and attempt to fix the error.

This error message can be triggered by any of the fatal errors . If you don’t have access to the admin email or can’t get WordPress emails then it becomes harder to find out what error is occurring.
3. How to Fix Syntax Error in WordPress #

This error usually occurs when you are trying to add code snippets into WordPress and have accidentally missed something or the code has incorrect syntax. This will result into a PHP parse error and you will see a notice like:
Parse error- syntax error, unexpected $end in /public_html/site1/wp-content/themes/my-theme/functions.php on line 278
The error message would indicate the unexpected thing found in the code and the location of the script where the error occurred with line number. To fix this issue you will have to correct the syntax. Most of the time it is a missing bracket, or some unexpected character in the code. [Fix syntax error in WordPress]
4. Checking for Corrupt .htaccess File #
The .htaccess file is a server configuration file used by WordPress to set up redirects. One of the most common causes of internal server error is the corrupt .htaccess file.
The easiest way to fix this is by simply visiting the Settings » Permalinks page in the WordPress admin area and then clicking on the ‘Save Changes’ button without making any changes.

WordPress will now try to update your .htaccess file or generate a new one. You can now visit your website to see if this has resolved the internal server error.
If you can still see the error, then you need to make sure that WordPress was able to generate or write to the .htaccess file.
Sometimes, due to file and directory permissions, WordPress may be unable to create or write to your .htaccess file.
You can now try to replace the .htaccess file manually. First, you need to log in to your website using FTP or the File Manager app under your hosting account control panel.
Next, you need to rename your main .htaccess file to something like .htaccess_old. This lets you keep the file as a backup, but WordPress won’t recognize it.
To rename the .htaccess file, you will need to log in to your site using FTP or the File Manager app in your hosting account’s cPanel dashboard.
Once you are connected, the .htaccess file will be located in the same directory where you will see folders like wp-content, wp-admin, and wp-includes. Simply right-click on the .htaccess file and rename it to .htaccess_old.

Next, you need to create a new .htaccess file. Inside your site’s root folder, right-click and then select the ‘Create new file’ option in your FTP client or File Manager app.

Name this new file .htaccess and click ‘OK’ to save it.
Now, this .htaccess file is currently empty, and you need to add default WordPress rewrite rules to it.
Simply right-click on the file and then select ‘View/Edit’ in your FTP client or File Manager app.

The empty file will open in a plain text editor like Notepad or TextEdit.
Now, you need to copy and paste the following code inside it:
# BEGIN WordPress
<IfModule mod_rewrite.c>
RewriteEngine On
RewriteBase /
RewriteRule ^index.php$ - [L]
RewriteCond %{REQUEST_FILENAME} !-f
RewriteCond %{REQUEST_FILENAME} !-d
RewriteRule . /index.php [L]
</IfModule>
# END WordPress
This code is the default rule set used by WordPress. Don’t forget to save your changes and upload the file back to the server.
You can now visit your website to see if this has resolved the internal server error.
If it did, then give yourself a pat on the back because you fixed the internal server error.
Important: Before you move on with other things, make sure that you go to the Settings » Permalinks page in the WordPress admin area and click the Save button without making any changes. This will regenerate the .htaccess file for you with proper rewrite rules to ensure that your post pages do not return a 404 error.
5. Increasing the PHP Memory Limit #
Sometimes, the internal server error can happen if a script consumes all the PHP memory limit.
The easiest way to increase the PHP memory limit is by editing the wp-config.php file. Be careful when you do this if you are a beginner. You want to follow these instructions carefully because even small mistakes in WordPress core files can break your site.
To begin, simply connect to your WordPress website using an FTP client or the File Manager app under your hosting account control panel.
You’ll find the wp-config.php file inside the main folder of your website. Right-click on it and select ‘Download.’ This will ensure that you have a file backup in case something goes wrong.
When you’ve saved that, you can right-click on it and select ‘View/Edit.’

Inside the wp-config.php file, you need to add the following code just above the line that reads, ‘That’s all, stop editing!
define( 'WP_MEMORY_LIMIT', '256M' );Note: If 256M doesn’t solve the problem, then try increasing it to 512M.
If you see the internal server error only when you try to log in to your WordPress admin or upload an image in your wp-admin, then you should increase the memory limit by following these steps:
- Create a blank text file on your computer and name it php.ini
- Paste this code in there: memory=256MB
- Save the file
- Upload it into your /wp-admin/ folder using FTP
If increasing the memory limit fixed the problem for you, then you have only fixed the problem temporarily. You still need to find the cause that is exhausting your memory limit.
6. Deactivate All WordPress Plugins #
If none of the above solutions worked for you, then this error is most likely being caused by a specific plugin installed on your website. It is also possible that it is a combination of plugins that are not playing nice with each other. If you can access the WordPress admin area of your website, then you can simply go to the plugins page and deactivate all WordPress plugins.

However, if you are unable to access the WordPress admin area, then you can deactivate all WordPress plugins using FTP. Simply connect to your WordPress website using an FTP client or the file manager app under your hosting account control panel.
Once connected, navigate to the /wp-content/ folder and rename the plugins folder to plugins.deactivated.

WordPress looks for plugins in the plugins folder. If the plugins folder is not found, it will automatically deactivate all plugins.
You can now try visiting your website to see if this resolved the internal server error on your website.
To restore all your plugins, you can simply rename the ‘plugins.deactivated’ folder back to plugins.
Your plugins will now be restored, but they will still be deactivated. You can now activate plugins individually and visit your website to figure out which plugin is causing the internal server error.
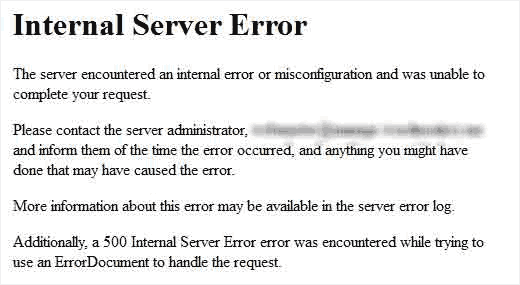
2. How to Fix 403 Forbidden Error in WordPress #

403 Forbidden error code is shown when your server permissions don’t allow access to a specific page. This is why the error is usually accompanied by the text:
403 Forbidden – You don’t have permission to access ‘/’ on this server.
Additionally, a 403 Forbidden error was encountered while trying to use an ErrorDocument to handle the request.
There are different scenarios when you can see this error. Incorrect file permissions, poorly coded security plugins, or server configuration are the most common culprits.
You can use these quick links if you want to skip to a specific method:
- Method 1: Deactivate Your Plugins Temporarily
- Method 2: Regenerate Your .htaccess File
- Method 3: Correct Your File and Directory Permissions
- Method 4: Clear Your Cache and Cookies
- Method 5: Temporarily Disable CDN (Content Delivery Network)
- Method 6: Check for Malware
- Method 7: Reach Out to WordPress Support
- Learn More Ways to Solve Common WordPress Errors
3. How to Fix Error Too Many Redirects Issue in WordPress #
Error too many redirects’ is caused by a misconfigured redirection issue in WordPress.
As you might already know, WordPress has an SEO-friendly URL structure feature that uses the redirect function. Similarly, many popular WordPress plugins use this feature to set up temporary redirects, create permanent 301 redirects, and fix 404 errors.
If you are using a plugin to fix the SSL insecure content issue or a WordPress caching plugin, then it may also affect redirects and cause the ‘too many redirects’ error.
This is how the ‘ERR_TOO_MANY_REDIRECTS’ message looks in Google Chrome.

However, this error doesn’t tell you what is causing the conflict and forcing the redirect loop in WordPress. This is how the error looks in Firefox with the message ‘The page isn’t redirecting properly’.

That being said, let’s take a look at how to fix the error too many redirects issue in WordPress.
We will walk you through step-by-step troubleshooting, getting access to your WordPress site, and preventing the error from happening again.
- Clear Browser Cookies and Cache
- Deactivate All WordPress Plugins
- Fix WordPress URLs
- Reset WordPress .htaccess File
- Preventing Error Too Many Redirects in WordPress
1. Clear Browser Cookies and Cache #
A common cause of the error could be your web browser cookies. Try accessing your website using a different web browser, like Firefox, Safari, Opera, or Microsoft Edge.
If you are able to access your website normally using a different browser, then you need to clear browser cookies and cache in your regular browser.

We have a detailed guide on how to clear your browser cache in all major browsers that will help you do that.
On the other hand, if changing the browser doesn’t fix the issue, then you can move on to the next step.
2. Deactivate All WordPress Plugins #
The most common cause of the WordPress redirect loops or ‘ERR_TOO_MANY_REDIRECTS’ is a plugin conflict. A WordPress plugin trying to set up a redirect in a way that conflicts with the default WordPress redirects can cause this error message.
To fix this, you need to deactivate all WordPress plugins on your website. Normally, you can just go to the Plugins » All Plugins page in the WordPress admin area and deactivate plugins from there.

However, we are assuming that due to the redirect error, you may be unable to access the WordPress admin area.
In that case, you will need to deactivate WordPress plugins using an FTP client like FileZilla or the File Manager app in your WordPress hosting control panel.
Simply connect to your website using an FTP client and go to the /wp-content/ folder.

There you will find the plugins folder, which you need to rename to ‘plugins.deactivate’.
Doing this will deactivate all the WordPress plugins on your site.

Basically, WordPress looks for a folder called plugins to load the plugin files. When it does not find the folder, it automatically disables the active plugins in the database.
Now, you can try visiting your WordPress website. If you are able to log in to your WordPress admin area now, then this means one of the plugins was causing the error.
To figure out which plugin was the culprit, you need to switch back to the FTP client or File Manager app and rename your plugins.deactivate folder back to ‘plugins’.
After that, switch to the WordPress admin area of your website and go to the Plugins » All Plugins page. From here, you can activate your plugins one by one and then visit your website to see if you can reproduce the error.
Once you find the plugin that is causing the error, you can find an alternative to that plugin or report the issue to the plugin’s WordPress support forum.
3. Fix WordPress URLs #
Another major cause of this error is a misconfiguration in WordPress URL settings. Normally, you can view these options on the Settings » General page.

For most websites, the URLs in the ‘WordPress Address’ and ‘Site Address’ fields must be the same. However, some users may end up using ‘www’ in one URL and a non-www URL in the other.
Since you might not have access to the WordPress admin area, you may need to fix the WordPress URLs using an FTP client or the File Manager app.
Simply connect to your WordPress site using an FTP client and go to /wp-content/themes/your-theme-folder/.

From here, you need to find the functions.php file and edit it using a plain text editor like Notepad or TextEdit.
4.How to Fix the 502 Bad Gateway Error in WordPress #
A 502 bad gateway error happens when your WordPress hosting server gets an invalid response for the requested page. This issue can be caused by various things, and the error message may vary depending on your server.

When a user visits a WordPress website, their browser sends a request to the hosting server. which then retrieves the page and sends it back to the browser. If an error occurs, the browser displays an error status code, such as 502 Bad Gateway. The most common reason for a 502 bad gateway error is that your request took too long for the server to respond.
The most common reason for this error is a delay in the server’s response to your request. This delay could result from temporary glitches due to high traffic, poorly coded WordPress themes or plugins, or server misconfigurations.
Solution :
- Reload Your Website
- Clear Browser Cache
- Disable the CDN or Firewall
- Update Your WordPress Themes and Plugins
- Restore a WordPress Website Backup
- Check for PHP Timeouts
- Contact Your Hosting Provider
1. Reload Your Website #
Sometimes, your server may take longer to respond due to increased traffic or low server resources. In that case, the problem could automatically disappear in a few minutes.
You should try reloading the web page that you are viewing to see if this is the cause. If this fixes your problem, then you do not need to read any further.
However, if you see this error frequently, then you will need to continue reading, as there may be something else that needs fixing.
2. Clear Browser Cache #
Your browser may be showing you the error page from the cache. Even after the issue is fixed, you will see the 502 error because the browser is loading your website from its cache.
To clear your browser cache, read our guide on how to clear your browser cache in all major browsers. You may also want to clear your WordPress cache as well.

Additionally, consider using a different browser to troubleshoot if the problem is happening because of the browser cache.
Still seeing the error in all browsers? Go ahead and continue reading.
3. Disable the CDN or Firewall #
If you are using a CDN service or WordPress firewall on your website, then their servers could be acting up. To check this, you will need to temporarily disable the CDN or firewall. This process will be different depending on which service you are using.
Once disabled, it will remove the additional layer that has been created between your browser and the hosting server. Your website will now load entirely from your server. If the issue was caused by the CDN or firewall service, then it should be resolved now. After that, you can contact your firewall or CDN service provider for support and solutions on how to enable it back properly.
4. Update Your WordPress Themes and Plugins #
At times, the 502 bad gateway error may be caused by outdated themes and plugins. To see if this is true, you have to check them one by one. First, you will need to deactivate all WordPress plugins via FTP. After that, visit your website to see if the error has been resolved.
If it has, then one of your plugins was causing the issue. You now need to activate all plugins one by one until you can reproduce the error. This will help you locate the plugin responsible for the error.
If deactivating plugins didn’t solve your issue, consider checking your WordPress theme. You will need to switch your WordPress theme via phpMyAdmin. After switching your theme to the default WordPress theme, visit your website to see if it’s working.
5. Restore a WordPress Website Backup #
For people using a backup plugin with their backups stored in a remote storage location, it may be a good time to restore one of these backups. This way, you can get your website back up and running just like before the error occurred.
6. Check for PHP Timeouts #
Sometimes, the cause behind the 502 bad gateway error is PHP timeouts.
A script on your website may take an unusually long time to execute, exceeding the time limit set by the server. This can happen due to complex calculations, database queries that drag on forever, or poorly optimized code. When this occurs, a PHP timeout error appears.
By checking for PHP timeouts, you can identify these sluggish scripts that might be causing the 502 bad gateway error. There are a few ways to check for PHP timeouts. One is to enable debug mode, which can provide some PHP error information.
5.How to Fix 503 Service Unavailable Error in WordPress #
A 503 service unavailable error indicates that your website server is unable to handle any requests due to overload or maintenance. The 503 error occurs when your web server is unable to get a proper response from a PHP script. This PHP script could be a WordPress plugin, a theme, or a misbehaving custom code snippet.
Solution:
1. Deactivate All WordPress Plugins #
All your WordPress plugins are PHP scripts, so the first thing you need to do is deactivate all your WordPress plugins.
Since you cannot log in to your WordPress dashboard due to the 503 error, you will need to connect to your website using an FTP client or File Manager in cPanel.
If you’re using an FTP client, then simply connect it to your website. For more details, please see our guide on how to use FTP to upload files to WordPress.
Once connected, simply go to the /wp-content/ folder. Then right-click on the ‘plugins’ folder and rename it to ‘plugins-old.’

Next, you need to create a new folder and name it plugins.
Now, you need to visit your WordPress site to see if this resolved the error.
If it did, then this means a plugin installed on your website was causing the error. The above steps have deactivated all WordPress plugins.
To figure out which plugin was causing the issue, you can go to the /wp-content/ folder. From here, right-click on the empty plugins folder and select the ‘Delete’ option.

After that you need to rename the plugins-old folder to plugins. This will make all your previously installed plugins available to WordPress. However, these plugins will remain deactivated.
You need to visit the WordPress admin area and then go to the plugins page. You can activate your plugins one by one and visit different pages on your website after activating each plugin. Keep doing that until you find the plugin causing the 503 error.
2. Switch to a Default WordPress Theme #
If deactivating plugins didn’t resolve the issue, then the next step would be to switch to a default WordPress theme. This will deactivate your current WordPress theme.
First, you need to connect to your WordPress site using an FTP client or File Manager in cPanel. Once connected, go to the /wp-content/themes/ folder.

Next, you can locate your currently active WordPress theme and download it to your computer as a backup.
To do that, simply right-click on the folder named after your website theme and click the ‘Download’ option.

After downloading your theme files, you can go ahead and delete them from your server.
Now, if you already have a default theme like Twenty Twenty-Four installed, then it will be automatically activated. If you don’t, then you can go ahead and install a default theme on your website.
Thoroughly check your website to make sure that the 503 service unavailable error is resolved.
3. Reinstall WordPress with a Fresh Copy #
If you are still facing 503 errors on your WordPress website after deactivating plugins and changing the website theme, then you may need to reinstall WordPress.
This method is usually required if one of your WordPress core files gets corrupted or modified. As a result, it might interfere with your site’s functionality and cause a 503 service unavailable error.
Before reinstalling WordPress, it’s better to create a backup of your website. This way, you can revert back to the previous state and recover your data in case something goes wrong.
You can follow our step-by-step guide on how to uninstall and reinstall WordPress for more details.
4. Upgrade Your Server Resources #
It is also possible that your website server resources are not able to handle all the requests. In that case, it’s worth upgrading your website hosting plan and checking if it resolves the 503 error.
However, before proceeding with the upgrade process, it would be best to contact your hosting provider and find out what’s causing the 503 error.
If it is because of a lack of server resources, then you can choose the fastest hosting provider or move to a higher-pricing package with your existing hosting company.
Remember to choose a website server with more storage and speed. It should be able to handle high-traffic loads without delay.
6.How to Fix the 504 Gateway Timeout Error in WordPress #
The 504 Gateway Timeout error happens when a website’s main server, which handles the visitor’s request to open the page, doesn’t get a quick response from the upstream server.
The upstream server may be busy or dealing with high traffic, causing a delay. In simpler terms, it’s like your request is waiting for information from another part of the website, but that part is too busy to respond promptly.
If you are using a website firewall and it is unable to connect to your WordPress web server, then you may also see a 504 gateway timeout error.

The error page’s appearance and the message may look different depending on your WordPress hosting company, the proxy server, or the web browser you are using.
Here are some of the most common 504 gateway timeout error messages:
- 504 Gateway Timeout
- HTTP 504
- 504 ERROR
- Gateway Timeout (504)
- HTTP Error 504 – Gateway Timeout
- Gateway Timeout Error
- Connection timed out (504)
- This site is experiencing technical difficulties (504)
- Gateway Timeout: The server didn’t respond in time
- The request timed out while connecting to the upstream server (504)
While the most common reason for the error is a proxy server unable to reach the upstream server, it can also be triggered by other hosting configuration issues.
Let’s see how to easily troubleshoot and fix the 504 gateway timeout error in WordPress:
- Wait and Reload the Page
- Turn Off the VPN
- Turn Off Your Website Firewall
- Disable Your Network Proxy
- Change Your DNS Servers
- Clean up your WordPress Database
- Deactivate WordPress Plugins and Switch to a Default Theme
- Turn Off Your Content Delivery Network (CDN) Temporarily
- Check Your DNS Status
- Check for PHP Timeout Errors
1. Wait and Reload the Page #
Sometimes, the 504 gateway timeout error code may simply be caused by connectivity issues on your WordPress hosting servers. Give it a few minutes, and then try reloading your WordPress website.
In some cases, you may also want to try clearing your browser cache and refresh the page again.
If the issue disappears, then you don’t need to take any further steps. However, if the error persists or reappears after a while, then continue reading to troubleshoot and fix the problem.
2. Turn Off the VPN #
If you are using a VPN service to browse the web, then you can try disabling it.

Sometimes, your VPN server may not be able to get a response from your managed WordPress hosting server, and this will result in a 504 gateway timeout error. If your website reappears, then this means that the VPN server is the culprit.
If using the VPN is important for you, then you can try switching to a different VPN server. However, if you see the error even after changing servers, then you will need to contact your VPN service provider for support.
3. Turn Off Your Website Firewall #
If you are using a DNS-level website firewall like Sucuri or Cloudflare, then try to temporarily disable the firewall. This will allow you to connect to your WordPress hosting server directly.

If that fixes the issue, then your hosting server is likely blocking the firewall IP addresses, which can cause this issue. You will need to contact your firewall service provider to get their list of IP addresses and then contact your web host to whitelist those IPs.
Sometimes, disabling the firewall might show you the actual server error notice. In that case, you should refer to our list of common WordPress errors to fix the specific issue.
4. Disable Your Network Proxy #
If you are connected to the internet through a proxy server, then that server may be unable to get a response from your WordPress website. Try accessing your website using a different internet connection or a different browser.
If it is down just for you, then you will need to change your network connectivity settings. You can contact your internet service provider or a network admin to troubleshoot the issue for you.
5. Change Your DNS Servers #
Your internet connection uses something called DNS servers. These servers help your computer connect to the different servers on the internet. If there are DNS issues, like the servers you’re using are down, then you could see a 504 gateway timeout error. The easiest way to check this is by changing the DNS servers your device is using.
On Windows computers, you can find them by going to Control Panel » Network and Internet » Network and Sharing Center » Change adapter settings.
Then, click on your network, select ‘Change settings of this connection’, and choose ‘Internet Protocol Version 4’ from the dropdown menu. You can now manually enter DNS server addresses.

On Mac computers, you can find DNS settings by going to Settings » Network.
Click on the ‘Advanced’ button, and then select the ‘DNS’ tab.

We recommend changing your DNS server address to 8.8.8.8 and 8.8.4.4 and applying the changes.
Try visiting your website again. If this solves your error, then you are all done. The problem was with your internet connection, and it is now fixed.
6. Clean Up Your WordPress Database #
A corrupt WordPress database may also trigger a 504 gateway timeout error. Don’t worry, your WordPress data is most likely safe. However, your database may need a little bit of spring cleaning.
This can be easily done by optimizing your WordPress database using phpMyAdmin or using a plugin like WP-Sweep.
Just make sure to back up the WordPress database before making any changes.
7. Deactivate WordPress Plugins and Switch to a Default Theme #
WordPress plugins and themes are less likely to cause a 504 gateway timeout error. However, if a plugin or theme is making too many requests to the server, then some of these requests may drop off and trigger a 504 gateway timeout error.
To test this, you need to deactivate all WordPress plugins via FTP.

After that, visit your website to see if the error has been resolved.
If it is, then one of your plugins was causing the issue. You now need to activate all plugins one by one until you can reproduce the error. This will help you locate the plugin responsible for the error. If deactivating plugins didn’t solve your issue, then you would want to check your WordPress theme. You will need to switch your WordPress theme via phpMyAdmin.
After switching your theme to the default WordPress theme, you need to visit your website to see if it’s working. If it is, then your original theme was the problem. Should all else fail, consider updating your WordPress and your PHP version.
8. Turn Off Your Content Delivery Network (CDN) #
A content delivery network (CDN) can sometimes be the culprit behind the 504 gateway timeout error. This is a pretty rare occurrence, but if one of the servers in the CDN is down, the issue may occur. You can temporarily disable the CDN and see if this is true. This process will vary depending on which service you are using.
9. Check Your DNS Status #
This step is more applicable if you’ve just migrated to a new hosting provider and updated your website’s DNS settings.
After moving your website to a new host, you have to make your current domain name point to the new hosting account by updating its DNS nameservers. Then, you have to wait up to 48 hours for the changes the propagate for all users. During this propagation period, your site may experience a short downtime, which can cause users to see a 504 gateway timeout error.
To confirm if your DNS settings are the problem, you can use a tool like DNS Checker. For more information about DNS updates, read our guide about clearing the DNS cache.
10. Check for PHP Timeout Errors #
The 504 gateway timeout error can sometimes be caused by a low PHP timeout limit set on your server.
This limit essentially defines the maximum amount of time a script on your website has to execute before timing out. If a complex script or database query takes longer than this limit, it can trigger the error. To fix this issue, you can check out our guide on how to fix Fatal error: Maximum execution time exceeded in WordPress.
6. How to Fix the WordPress White Screen of Death #
The majority of the time, when you see a white screen of death when trying to visit your WordPress website, it means that a script on your website exhausted the memory limit.
The unresponsive script either gets killed by your WordPress hosting server or simply times out. This is why no actual error message is generated, and you just see a blank white screen.

However, sometimes, you may see an error message.
For example, you might see a critical error message instead of a blank page.

Whether you are seeing a blank screen or the message ‘There has been a critical error on your website’, it’s the same error. This error can also happen due to a poorly coded theme or plugin installed on your site. Sometimes, it can happen if there is an issue with your web hosting server.
Since the white screen error can be caused by any number of things, it requires methodical troubleshooting to fix it. Here are the steps you should try:
- Check Whether the Problem Happens on Your Other Sites
- Fix the White Screen Error With WordPress Recovery Mode
- Increase the Memory Limit
- Fix the White Screen Error by Disabling All Plugins
- Activate the Default Theme
- Enable Debug Mode to Catch Errors in WordPress
- Clear the WordPress Cache
1. Check Whether the Problem Happens on Your Other Sites #
If you have other WordPress sites installed on the same hosting account, then you want to start by checking if the problem is happening on other sites as well. If it is, then that’s a strong indicator that something is wrong with your WordPress hosting service. This could be a temporary issue affecting their service, and you need to reach out to their support for more help.
On the other hand, if the issue is only happening with one website or a specific part of that site, then you know that the problem is with that particular website.
2. Fix the White Screen Error With WordPress Recovery Mode #
If the white screen of death error is caused by a WordPress plugin or theme, then WordPress may be able to catch it.
The new fatal error protection feature introduced in WordPress 5.2 can sometimes catch the error, so you may not even see a white screen. Instead, you will see a message that the site is having technical difficulties.

3. Increase the Memory Limit #
Usually, this error happens because a script has exhausted your web server’s memory and quit in the middle.
To fix this, you need to increase the PHP memory available to WordPress. This will allow the script to use more memory to finish the job it was supposed to do. You will need to edit the wp-config.php file on your WordPress site or use a code snippet plugin like WPCode. You can follow the instructions in our tutorial on how to increase PHP memory in WordPress.
4. Fix the White Screen Error by Disabling All Plugins #
If increasing the PHP memory limit did not help, or if you have a high memory limit, like 256M or 512M, then you need to start troubleshooting.
In our experience of troubleshooting this issue, we have always found that the issue is either with a specific plugin or a theme. Let’s go ahead and disable all the plugins.
If you can still access the WordPress admin dashboard, then you can simply go to the Plugins » Installed Plugins page. Select all the installed plugins and then select ‘Deactivate’ under the ‘Bulk actions’ dropdown.

However, if you don’t have access to the WordPress admin area, then you will need to deactivate all plugins via FTP.
First, connect to your WordPress site using an FTP client or your hosting provider’s file manager. Once connected, go to the wp-content folder, where you will see the plugins folder.
Now, you need to right-click on the plugins folder and then select ‘Rename’. You can rename the plugins folder to ‘plugins-deactivated’.

WordPress looks for a folder named plugins to load all plugins. When it cannot find the folder, it simply deactivates all plugins.
If this fixes the issue, then enable one plugin at a time to get to the bottom of the issue. Once you find the plugin causing the issue, you can replace it with an alternative.
5. Activate the Default Theme #
If the plugin troubleshooting doesn’t fix the issue, then you should try replacing your active theme with a default theme. First, connect to your website using an FTP client and go to the /wp-content/themes/ folder. It contains all installed themes on your website.
Right-click to select your current WordPress theme and download it to your computer as a backup.

Next, you need to delete your current theme from your website. Simply right-click on your theme folder and select ‘Delete’. Your FTP client will now delete the theme from your website.

Now, if you have a default WordPress theme like (Twenty Twenty-Two or Twenty Twenty-Three) installed on your website, then WordPress will automatically start using it as the default theme. However, if you don’t have a default theme installed, then you need to manually install it using FTP.
If this fixes the issue, then you should look at your theme’s functions.php file. If there are extra spaces at the bottom of the file, then you need to remove those, and sometimes that fixes the issue. If you are using a poorly coded function in your theme’s functions.php file, then it can cause the white screen of death error as well.
Consider downloading a fresh copy of your theme from its source and then installing it manually using FTP.
6. Enable Debug Mode to Catch Errors in WordPress #
If nothing has helped so far, then the next step is to turn on debugging in WordPress. This will keep error logs that allow you to see what type of errors are being outputted.
Simply add the following code to your wp-config.php file:
define( 'WP_DEBUG', true);define( 'WP_DEBUG_LOG', true );Once you add this, the blank screen will now have errors, warnings, and notices. These may be able to help you determine the root cause. If you don’t see any errors, then you may still want to check the debug log.
Simply visit the wp-content folder on your website using an FTP client. There, you will find a new debug.log file containing a log of all errors, notices, and warnings.

7. Clear the WordPress Cache #
Sometimes, you may have access to the backend, but the front end of the site has the white screen of death. This can happen because of a caching plugin. In that case, you simply need to empty your WordPress cache. You can see our guide on how to clear the cache in WordPress for detailed instructions.
8. Fix the White Screen Error for Longer Articles #
If you have a white screen of death only on a very long post or page, then this method might work.
This trick basically increases PHP’s text processing capability by increasing the recursion and backtrack limit. You can paste the following code into your wp-config.php file:
/** Trick for long posts */
ini_set('pcre.recursion_limit',20000000);
ini_set('pcre.backtrack_limit',10000000);
6.How to Fix Your Connection is Not Private Error #
‘Your connection is not private’ error appears on websites using the SSL / HTTPS protocol. It shows when the browser is unable to validate the SSL certificate issued by the website.
Any website using SSL / HTTPS sends security certificate information to a user’s browser upon each visit. The browser then tries to validate this certificate using the public key accompanying it.
If this information checks out, then the browser encrypts the data using the private key sent by your website. This encryption secures the data transfer between a user’s browser and your WordPress site.
However, if the browser is unable to validate the certificate, then it cannot transfer the data securely and displays the error that your connection to the website is not private.
This is a common SSL error and appears on all modern browsers with slightly different error messages.
Google Chrome:
Google Chrome will show this error as ‘Your connection is not private’.

here are the steps you can take to fix the ‘Your connection is not private’ error:
- Force Reload a Page
- Check with Multiple Browsers
- Clear Your Browser Cache
- Check Your Computer’s Clock
- Turn Off Antivirus and VPN Apps
- Check Your SSL Certificate Expiration
- Test Your SSL Server
- Check Certificate Domain Name
1. Force Reload a Page #
If you see the ‘Connection is not secure’ error on your website, you should first try the “turning it on and off” method. This means you can simply start by closing and reopening the browser window. After that, search for your website, and the error may be gone. However, if that doesn’t work, you can force-reload the page by clicking the ‘Reload this page’ button at the top left corner of the screen.

This is because sometimes this error is caused by a temporary issue on your website or browser.
Reloading the page forces your browser to establish a new connection to the website, which could clear up the glitch. It also encourages the browser to ignore the cached version of the page and load the latest version.
2. Check With Multiple Browsers #
If the first trick doesn’t work, you should try checking your WordPress blog in multiple browsers. This will help you determine whether the error is with your website or specific to the browser you are using.
It can be caused by browser security settings or cache. For more information, see our beginner’s guide on how to test a WordPress site in different browsers.

If you find that a specific browser causes the error, you can try reinstalling it to fix it. Otherwise, you can move on to try the next steps in this guide.
3. Clear Your Browser Cache #
Your browser cache stores the security certificates for all the websites that you visit. If you just renewed your site’s security certificate, then you may see the ‘connection is not secure’ error because the browser still has the old certificate cached.
In some cases, the cached data related to the security certificate might be corrupted, which can also lead to this error.
In that case, you can easily clear your browser cache by clicking the three-dot icon at the top right corner of Google Chrome. This will open a dropdown menu, where you must select the ‘Clear browsing data’ option.

This will launch the Chrome Settings page and display a prompt on the screen. Here, select ‘All Time’ as the time range from the dropdown menu and click the ‘Clear Data’ button.
Your browser cache will now be cleared.

If you are using any of the other browsers, then see our complete guide on how to clear browser cache for all major browsers. Once you have cleared the cache, try visiting the website again to see if the issue has been resolved. If it hasn’t, then continue reading.
4. Check Your Computer’s Clock #
Normally, your computer syncs its date and time settings automatically. However, if your computer has incorrect date/time settings, your browser may think that a website’s SSL certificate is invalid, leading to the ‘connection is not secure’ error.
Sync Date / Time on Windows Computers
If you are using a Windows computer, then simply right-click on the taskbar and select the ‘Adjust Date and Time settings’ option.

This will open the date and time section in the Windows Settings app. Here, you must make sure that your computer’s date and time are correct and that the ‘Set time automatically’ option is checked.

Here, you will want to make sure that the ‘Set date and time automatically using your current location’ option is toggled on.
Once you have done that, visit your website to see if the error has been fixed.
5. Turn Off Antivirus and VPN Apps #
If you are using an antivirus program for your computer or a VPN service, then you may want to temporarily turn them off.
Some antivirus programs have features that monitor and scan HTTPS traffic for malware. This can sometimes disrupt the communication between your browser and the website, leading to certificate verification errors.
By turning off these apps, you can verify whether they were blocking the SSL certificate and forcing your browser to show the ‘Your connection is not private’ error.
6. Check Your SSL Certificate Expiration #
Another common reason for the ‘connection is not secure’ error is an expired SSL certificate. These certificates are issued for a specific period and expire when they reach the end of that deadline.
You can check your certificate’s expiration date by clicking on the ‘View Site Information’ icon. This will open a prompt, and you will need to expand the ‘Connection is secure’ tab.
Next, click on the ‘Certificate is valid’ option.

This will open a popup with a list of your SSL certificate details. The expiration date is shown in the ‘Validity’ section.
Keep in mind that most domain registrars and SSL certificate providers will automatically notify you when your SSL certificate needs to be renewed.

However, those mechanisms may fail, and your SSL certificate could expire. In that case, you don’t need to worry because you can easily fix it by replacing your SSL certificate.
7.How to Turn Off PHP Errors in WordPress #
PHP errors that you can see on your WordPress site are usually warnings and notices. These are not like internal server error, syntax errors, or fatal errors, which stop your website from loading.
Notices and warnings are the kind of errors that do not stop WordPress from loading your website. See how WordPress actually works behind the scenes for more details.

The purpose of these errors are to help developers debug issues with their code

If you see an error like above on on your WordPress site, then you may want to inform the respective theme or plugin developer. They may release a fix that would make the error go away. Meanwhile, you can also turn these errors off.
Turning off PHP Errors in WordPress #
For this part, you will need to edit the wp-config.php file.
Inside your wp-config.php file, look for the following line:
define('WP_DEBUG', true);It is also possible, that this line is already set to false. In that case, you’ll see the following code:
define('WP_DEBUG', false);In either case, you need to replace this line with the following code:
ini_set('display_errors','Off');
ini_set('error_reporting', E_ALL );
define('WP_DEBUG', false);
define('WP_DEBUG_DISPLAY', false);
Don’t forget to save your changes and upload your wp-config.php file back to the server. You can now visit your website to confirm that the PHP errors, notices, and warnings have disappeared from your website.
Turning on PHP Errors in WordPress #
If you are working on a website on local server or staging area, then you may want to turn on error reporting. In that case, you need to edit your wp-config.php file and replace the code you added earlier with the following code:
define('WP_DEBUG', true);
define('WP_DEBUG_DISPLAY', true);
This code will allow WordPress to start displaying PHP errors, warnings, and notices again.
8. How to Fix File and Folder Permissions Error in WordPress #
The correct file and folder permission settings allow WordPress to create folders and files. Here are the recommended file permissions for most users:
- 755 for all folders and sub-folders. This allows the website owner to read, write, and execute folders.
- 644 for all files. This allows the website owner to read and write files while others can only read them.
We have two methods, and you can use the quick links below to skip to your preferred method:
- Method 1: Fix WordPress File Permissions With a Free Plugin
- Method 2: Fix WordPress Permissions for Files and Folders Manually
Method 1: Fix WordPress File Permissions With a Free Plugin #
Fixing the WordPress file and folder permissions issues usually involves using an FTP client. If you’re confident in resolving this error manually, then you can skip to the second method.
If not, then you can use this plugin method with the All-in-One Security plugin. This plugin has a feature to change WordPress file and folder permissions in a few clicks.
First, install the All-in-One Security plugin in WordPress. You can check out our step-by-step guide on how to install a WordPress plugin for more information.
Once done, go to WP Security » File Security. Then, navigate to the ‘File Permissions’ tab.

Here, the plugin will scan the critical WordPress core folders and files and highlight any permission settings that are insecure.
If the plugin finds one folder or file with permission errors, the ‘Recommended action’ column will have a button called ‘Set recommended permissions.’
To fix it, simply click on it and the plugin will use the correct WordPress file or folder permissions.

Once done, the ‘Recommended action’ column should now be changed to ‘No action required.’
Method 2: Fix WordPress Permissions for Files and Folders Manually #
First, you will need to connect to your WordPress site using an FTP client like FileZilla or the File Manager app in your cPanel. Once connected, simply go to the root folder of your WordPress website.
After that, you must select all of the WordPress folders in the root directory and then right-click to select ‘File permissions’.

This will make the file permissions dialog box pop up.
Now, you need to enter ‘755’ into the numeric value field. After that, you must click on the ‘Recurse into subdirectories’ checkbox and then select the ‘Apply to directories only’ option.

Click on the ‘OK’ button to continue. Your FTP client will start to set permissions for folders and sub-folders. You will need to wait for it to finish.
Next, you need to select all files and folders in the root folder of your WordPress site and then right-click to select ‘File permissions’.

The file permissions dialog box will appear.
This time, you need to enter ‘644’ into the ‘Numeric value’ box. After that, simply click on the ‘Recurse into subdirectories’ checkbox and then select the ‘Apply to files only’ option.

Click ‘OK’ to continue. Your FTP client will now start setting file permissions for all files on your WordPress site.
9. How to Fix “Sorry, This File Type Is Not Permitted for Security Reasons” Error in WordPress #
The error “Sorry, this file type is not permitted for security reasons” appears when you try to upload a file type that WordPress does not support. You may have seen this error message appear when trying to add a new file to your Media Library.

If you use the latest WordPress version, you may see the error message saying, “Sorry, you are not allowed to upload this file type.”
For security reasons, WordPress restricts the file types you can upload through your WordPress dashboard.

The permitted file types include all common images, video, document, and audio formats.
One solution to fix this problem is to upload the files through FTP or your WordPress hosting provider’s file manager app. However, it is not as convenient as using the built-in WordPress media library.
So, let’s take a look at how to fix the “Sorry, this file type is not permitted for security reasons” error in WordPress.
You can use the links below to jump to the different solutions:
- Option 1: Check and Fix the File Type Extension Spelling
- Option 2: Allow New File Types in WordPress With the File Upload Types Plugin
- Option 3: Allow New SVG File Types Using WPCode
- Option 4: Edit Your wp-config.php File (Advanced)
Option 1: Check and Fix the File Type Extension Spelling #
Let’s say that you might have uploaded the same types of files to WordPress previously with success. However, this time, your attempt has failed, and you are wondering why that is. In this case, it is likely that the error occurs because you have misspelled the file extension.
A file extension is the 3 or 4-letter file type suffix that appears at the end of file names on your computer. For instance, an image file may be named holidayphoto.png, where holidayphoto is the file name and png is the extension. These extensions are used by many programs and applications, including WordPress, to recognize file types.
Here are the default WordPress file types and extensions:
Images: .png, .gif, .jpg, .jpeg, .ico, .webp
Documents: .pdf, .doc, .docx, .xls, .xlsx, .ppt, .pptx, .pps, .ppsx, .odt, .psd
Audio: .wav, .mp3, .m4a, .ogg
Video: .mp4, .m4v, .mpg, .mov, .wmv, .avi, .ogv, .3gp, .3g2
Option 2: Allow New File Types in WordPress With the File Upload Types Plugin #
If you want to upload file types that are not supported by WordPress, then you can still upload them by adding them as a supported file type.
The File Upload Types plugin is the easiest way to fix the “Sorry, this file type is not permitted for security reasons” error.
First, you need to install and activate the File Upload Types plugin. For more details, see our step-by-step guide on how to install a WordPress plugin. Upon activation, go to the Settings » File Upload Types page in your WordPress admin area. Then, simply type your file type into the search box.

Next, check the box next to the file type(s) that you want to enable. This will change the default file type upload settings. You must then click on the ‘Save Settings’ button at the bottom of the screen to store your changes.

Now, go ahead and return to the media library. You will be able to add your file(s) without getting an error message.

Option 3: Allow New SVG File Types Using WPCode #
You can also manually specify which file types are allowed to be uploaded on your WordPress website. However, it can be dangerous to edit your site’s files directly because small mistakes can cause big WordPress errors.
That’s why we recommend using WPCode instead. WPCode is the best WordPress code plugin that allows you to insert code snippets into your website without directly editing your theme’s functions.php file.
Option 4: Edit Your wp-config.php File (Advanced) #
This method is the most advanced of all the ones we’ve listed, and we only recommend it if none of the above options have worked to upload your custom file types.
We also strongly suggest backing up your WordPress website using a plugin like Duplicator before following this tutorial to prevent further errors.This method requires editing your wp-config.php file. For more information, you can check out our guide on how to edit your wp-config.php file in WordPress.
define('ALLOW_UNFILTERED_UPLOADS', true);
10. How to Fix WordPress Posts Returning 404 Error #
Why Are My WordPress Posts Returning a 404 Error? #
There are several reasons why your posts might be showing a 404 “Page Not Found” error in WordPress. These can include:
- Plugin or theme conflicts: Sometimes, plugins or themes you’ve installed on your site can interfere with how WordPress handles permalinks. This can lead to broken links and 404 errors.
- Custom code issues: If you’ve added custom code to your website, there might be errors in the code that are affecting permalinks or causing other conflicts, resulting in 404 errors for your posts.
- Issues with your .htaccess file: The .htaccess file plays a role in how WordPress structures URLs. If this file is corrupted or missing, it can lead to 404 errors for your posts or pages
How to fix WordPress posts returning 404 errors. You can use the links below to jump straight to different solutions:
- Method 1: Check for Plugin or Theme Conflicts and Custom Code Issues
- Method 2: Fix Your Permalink Settings
- Method 3: Update the WordPress .htaccess File
- Method 4: Contact Your Hosting Provider
- Method 5: Enable mod-rewrite (Local WordPress Installation)
Method 1: Check for Plugin or Theme Conflicts and Custom Code Issues #
Sometimes, plugins, themes, or custom code you’ve added to your WordPress website can interfere with permalinks or cause conflicts, leading to 404 errors. We’ve even experienced it ourselves when we’re testing tools on our demo site.
One way to solve this problem is to temporarily deactivate plugins. Plugins can sometimes disrupt how WordPress handles links.
Once you’ve deactivated the plugins, you can reactivate them one by one while checking if the 404 error reappears after activating each plugin. If the error shows up after activating a specific plugin, that might be the culprit.
Similarly, your WordPress theme might be causing the conflict.
To check, you can temporarily switch to a default WordPress theme like Twenty Twenty-Three or Twenty Twenty-Four. All you need to do is go to Appearance » Themes and click ‘Activate’ on a default theme.

If the 404 error disappears with the default theme, it indicates a potential conflict with your current theme. You can then try troubleshooting the theme or consider using a different theme.
If you’ve recently inserted code snippets to your website, there might be errors in the code causing the 404 errors. Take a close look at the code you added and see if you can identify any mistakes.
The safest way to add code snippets to WordPress is with the WPCode plugin. This plugin lets you insert custom code without directly working with the theme files, reducing the risk of breaking your website.

If none of these solutions work, move on to the next method where we’ll troubleshoot your permalink settings.
Method 2: Fix Your Permalink Settings #
WordPress posts can return 404 errors because of problems with rewrite rules in your .htaccess file. In most cases, you can fix the problem by updating your permalink settings.
Simply go to Settings » Permalinks in your WordPress admin, and click on the ‘Save Changes’ button.

There is no need to make changes to the permalink settings themselves. This will update your permalink settings and flush the rewrite rules.
In most cases, this solution fixes the WordPress posts 404 error. However, if it does not work for you, then you probably need to update your .htaccess file manually.
Method 3: Update the WordPress .htaccess File #
Before you start, make sure to back up your WordPress .htaccess file first. If something goes wrong, you can easily restore the original file. Now, you will need to connect to your server using an FTP client like FileZilla or the File Manager app in your WordPress hosting dashboard.
Next, you will need to find and edit the .htaccess file, which is located in the same location as folders like /wp-content/ and /wp-includes/.
Simply right-click on the file and select ‘File permissions.’

You can make the file writeable by changing its permissions to 666.
Simply enter ‘666’ into the ‘Numeric value’ box and then click on ‘OK’.

Then, you need to repeat the steps in the first method of our tutorial. Once you have done this, don’t forget to change the permissions back to 660.
You can also edit the file and add code to it.
Once you have opened the .htaccess file with a text editor, simply insert this code:
# BEGIN WordPress
<IfModule mod_rewrite.c>
RewriteEngine On
RewriteBase /
RewriteRule ^index\.php$ - [L]
RewriteCond %{REQUEST_FILENAME} !-f
RewriteCond %{REQUEST_FILENAME} !-d
RewriteRule . /index.php [L]
</IfModule>
# END WordPress
Method 5: Enable mod-rewrite (Local WordPress Installation) #
If you are using a local server for testing purposes, then you will need to enable mod_rewrite in the Apache configuration of your MAMP, WAMP, or XAMPP site. This will allow WordPress to generate clean URLs and prevent the 404 error for posts and pages on your local server.
How you do this will differ by the platform you use. People using XAMPP can open their control panel and click the ‘Config’ button within Actions. Then, select ‘Apache (httpd.conf).’
 menu on XAMPP")
Next, you will need to find this line #LoadModule rewrite_module modules/mod_rewrite.so and remove the ‘#’ to uncomment it. This will load the mod_rewrite.
 menu on XAMPP")
Then, find all instances of AllowOverride None and change them to AllowOverride All. The ‘All’ value means that all directives can be overridden.

Once done, you can save the httpd.conf file and close it. After that, in the XAMPP control panel, click ‘Stop’ on the Apache module and ‘Start’ again to restart it.
11.How to Fix WordPress Not Sending Email Issue #
The most common reason for emails going missing is that your WordPress hosting server is not properly configured to use the PHP mail() function.
Even if your hosting is configured to use it, many email service providers, like Gmail and others, use a variety of tools to reduce email spam. These tools try to detect that an email is coming from the location that it claims to be from.
What Is SMTP?
SMTP (Simple Mail Transfer Protocol) is the industry standard for sending emails. Unlike the PHP mail() function, SMTP uses proper authentication, which leads to high email deliverability.
WordPress has a WP Mail SMTP plugin that configures your WordPress site to send emails using SMTP instead of the PHP mail() function.
Solution :
Step 1: Install the WP Mail SMTP Plugin #
Whatever SMTP service you choose, you’ll need to have the WP Mail SMTP plugin installed on your site. This lets you switch WordPress from using the built-in PHP mail() function to using your SMTP service.
First, install and activate the WP Mail SMTP plugin. If you’re not sure how, then see our step-by-step guide on how to install a WordPress plugin.
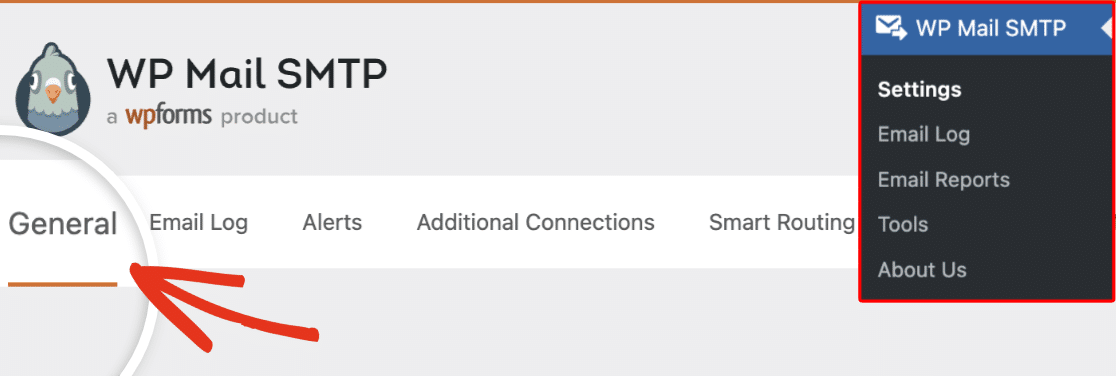
Next, click on ‘WP Mail SMTP’ in your WordPress dashboard to configure the plugin settings.

You will need to start by entering the name and business email address you want your site’s emails to come from. Make sure you use the same email address here that you’ll be using for your SMTP mailing service.

You can choose to force emails to use this name and email address, even if other plugins, like WPForms, have different settings. WP Mail SMTP will override the other plugins’ settings. After that, you need to choose an SMTP mailing service for your site.
Installing and Configuring the WP Mail SMTP Plugin #
Before getting started, you’ll need to install and activate the WP Mail SMTP plugin.
Once you’ve verified your license, you’re ready to configure the plugin’s settings. You can find them by going to WP Mail SMTP » Settings and looking under the General tab.
Below, we’ll cover the settings needed for this setup.
From Email #
This is the email address that all of your site’s emails will be sent from. You can type your email address into the field provided, including any aliases you’ve configured, after you connect your site to the Gmail API in later steps.

The Force From Email option will make it so that all the emails sent from your site come from the address you’ve entered.
Note: In order to use multiple Gmail aliases throughout your WordPress site as the From Email address, make sure to leave the Force From Email box unchecked.
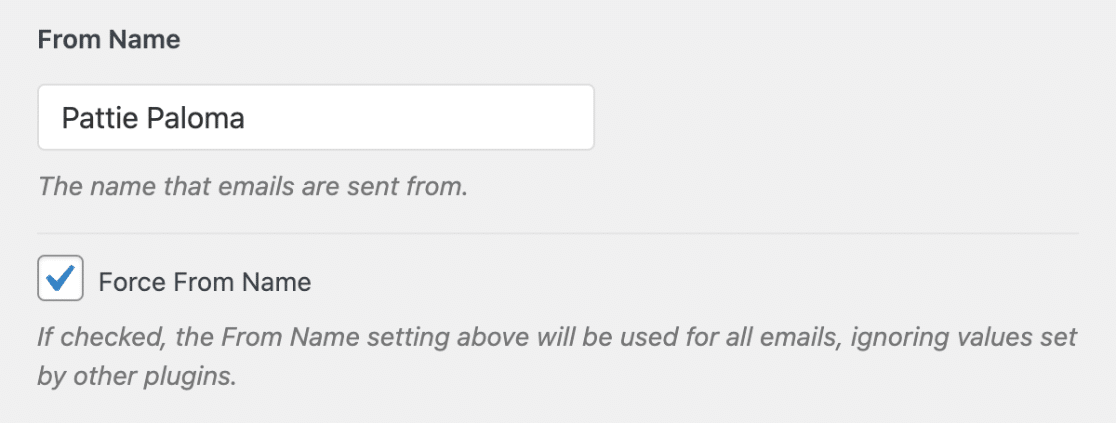
From Name #
Below the From Email, you can set the From Name. This is the name associated with the emails your site sends out. By default, it will be set to your site’s name, but you can adjust it to anything you’d like.
You can also check the Force From Name option to apply this setting site-wide.
Mailer #
This is where you can choose which mailer you’d like your site to use. Select the Google / Gmail option.

Once you’ve chosen this mailer, you should see a new section appear titled Google / Gmail with more authorization options.

There are two ways to configure the Google Workspace / Gmail mailer: Using the One-Click Setup or manually creating a custom Google app to generate your Client ID and Client Secret.
Creating a Web App in Your Google Account #
You’ll be coming back to WP Mail SMTP’s settings page a little later, so for this step, open a new tab or window in your browser. In the new tab or window you’ve opened, log in to your Google account and open your Google Cloud Console.
Note: Before continuing, be sure to sign out of all other Google accounts besides the account you’ll be using for the SMTP setup.
Also, if you’re using Google Workspace, make sure that the Google account you use has permission to send emails (in other words, access to its own inbox). If it’s your first time using Google Cloud Console, you may see a pop-up asking you to select your country and agree to the Terms of Service. Go ahead and do so, then click on AGREE AND CONTINUE to move on to the next step.

If you’ve logged in to the Google Cloud Console before, you’ll likely bypass the Terms of Service.
Creating or Choosing a Project #
First, you’ll need to choose a project to use for your app. You can select an existing one or create a new one. To do so, click on the projects dropdown in the toolbar at the top of your dashboard.

In the popup that appears, select an existing project from the list or click on New Project in the top right corner.

If you selected an existing project, move on to the next step. For a new project, enter a project name and select an organization and location from the dropdowns.

Then click on the CREATE button.
Enabling the Gmail API #
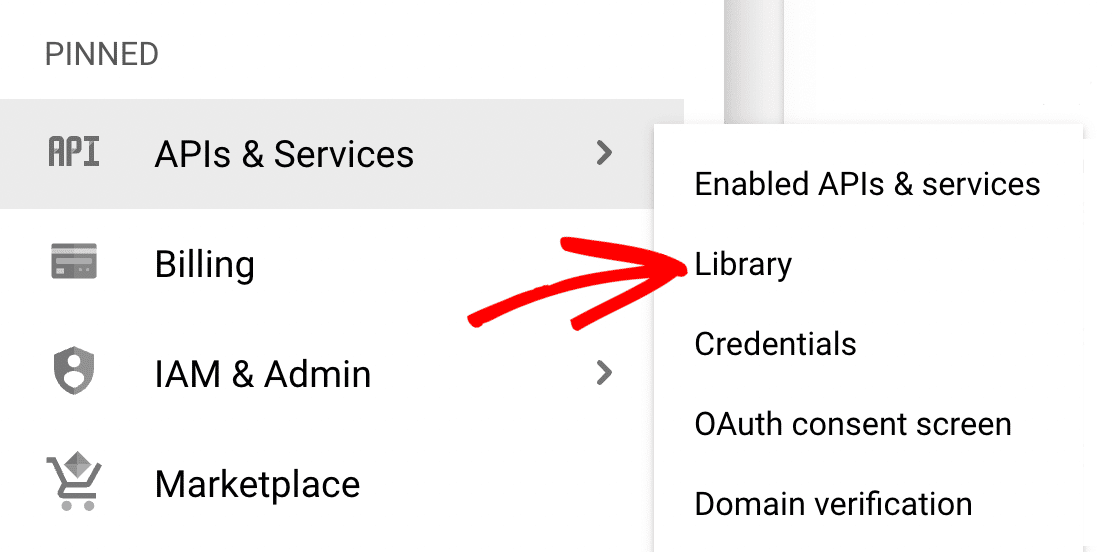
Next, you need to enable the Gmail API for your project. In your Google Cloud Console sidebar, go to APIs & Services » Library.
Note: If you don’t see APIs & Services in the sidebar, it may be found by scrolling down and clicking on MORE PRODUCTS.
Then look under Category and click on Google Workspace, or enter “Gmail API” in the search bar.

Click on the Gmail API result.

On the Gmail API page, click on the blue ENABLE button.

Creating Your Application’s Credentials #
After you enable the Gmail API, you should be redirected to the Gmail API Overview page. Here, click on the CREATE CREDENTIALS button.

On the next page, Google will ask a few questions to determine the Credential Type you need. From the Select an API dropdown, choose Gmail API.
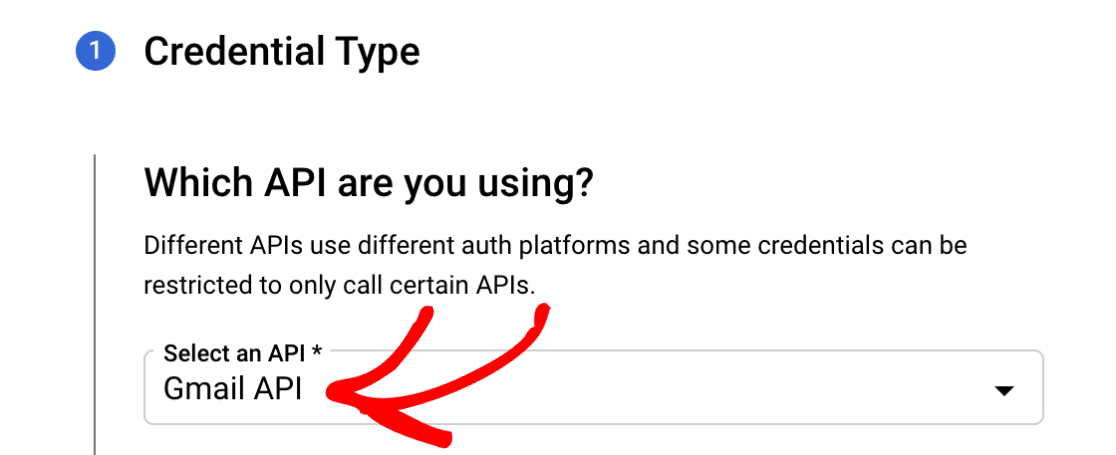
Note: If you don’t see an option for the Gmail API in the dropdown, be sure that you have the Gmail API enabled for your account.
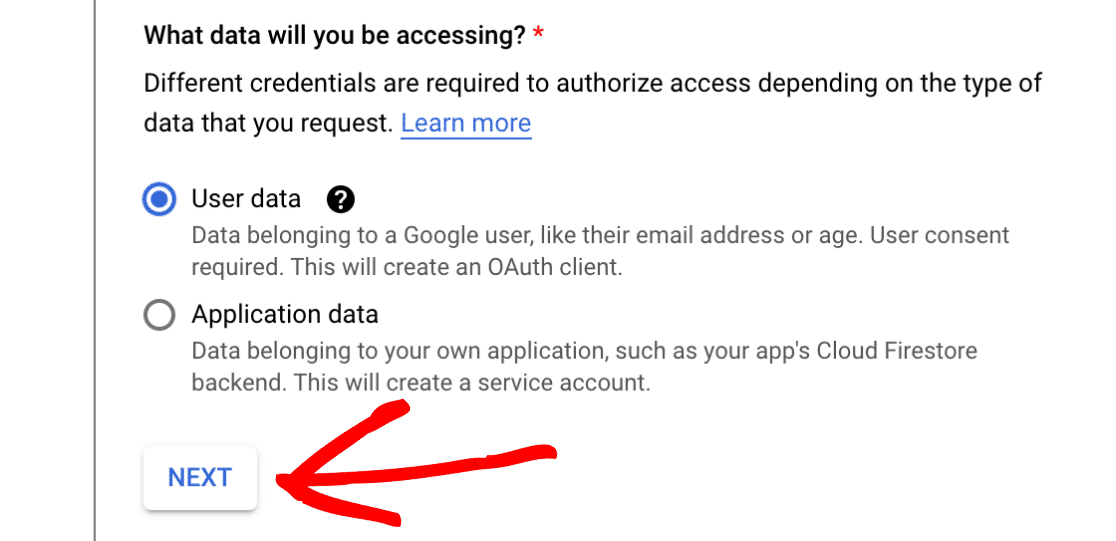
Next, under What data will you be accessing?, select the User data option. Then click the NEXT button to proceed.
Configuring Your OAuth Consent Screen #
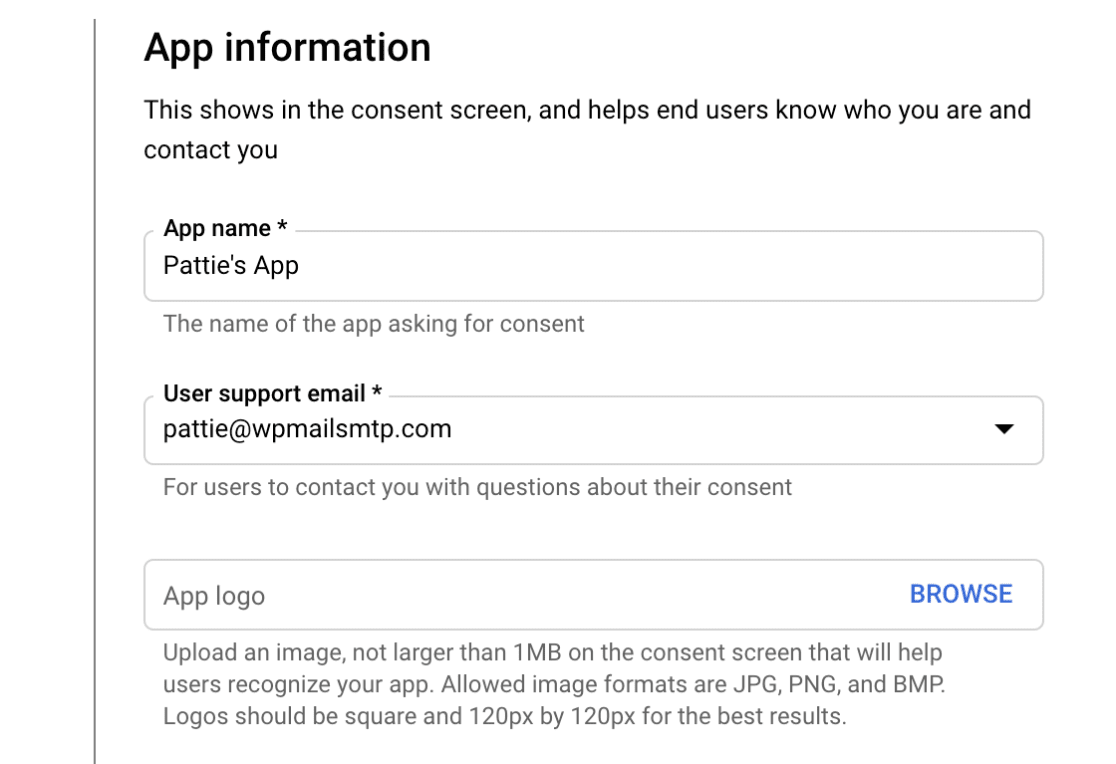
Google will then ask for some basic information about your app. This section is mostly for personal use since no one else will be using your app. However, some fields are still marked as required:
- App name: Enter an app name of your choice (e.g., Pattie’s App).
- User support email: Select your email address from the choices provided.
- App logo: If you’d like, you can upload a logo for your app. This is optional.
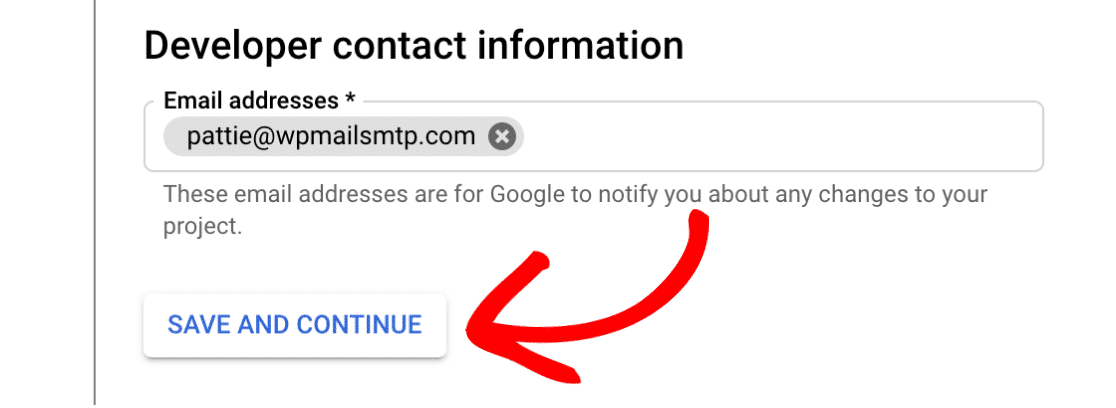
Finally, add your email address in the Email addresses field. Then click on the SAVE AND CONTINUE button to proceed to the next step.
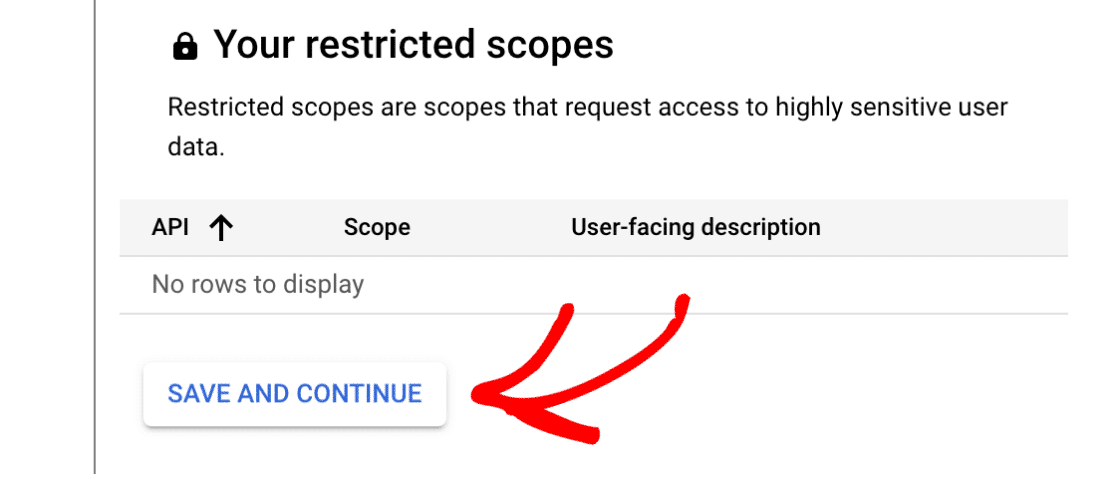
Configuring Scopes (Optional) #
This is an optional step that we’ll be skipping for this tutorial. Scroll down to the end of the Scopes section and click on the SAVE AND CONTINUE button to proceed.
Note: For more information on Gmail API scopes, please see Google’s developer documentation.
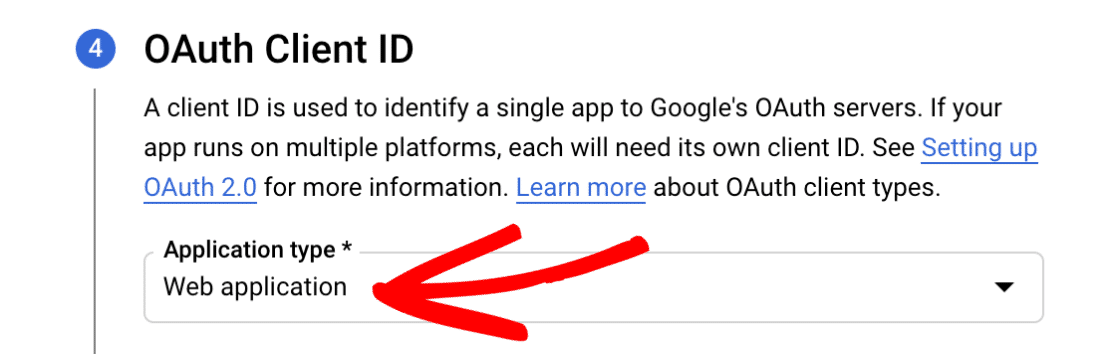
Setting Up Your OAuth Client ID #
Next, you’ll need to fill out some information about your OAuth Client ID.
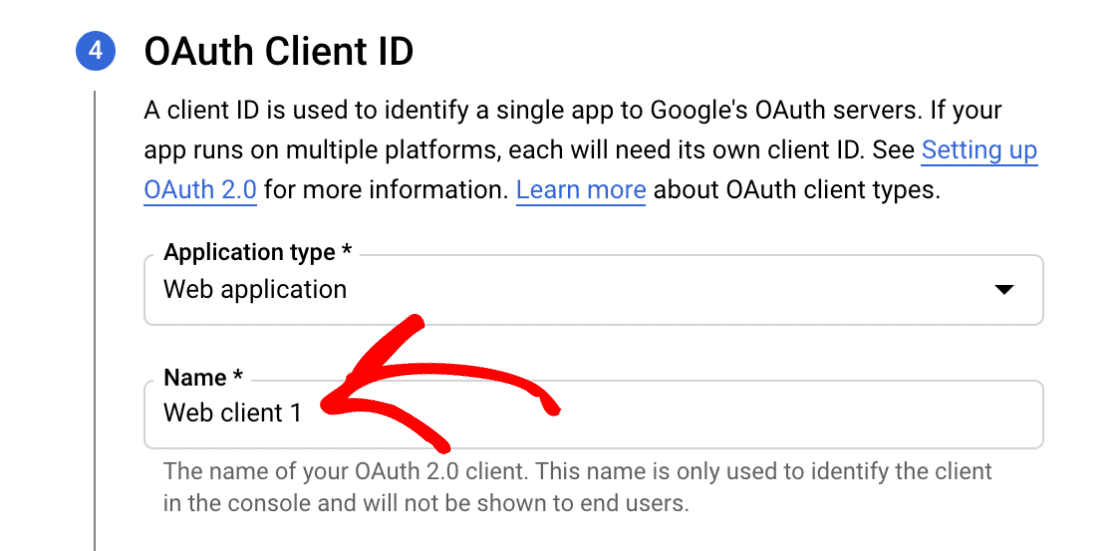
From the Application type dropdown, select the Web application option. Once you do so, more fields will automatically populate.
You can leave the Name field as the default value or change it to something more relevant. For this example, we’ll keep the default name, Web client 1.
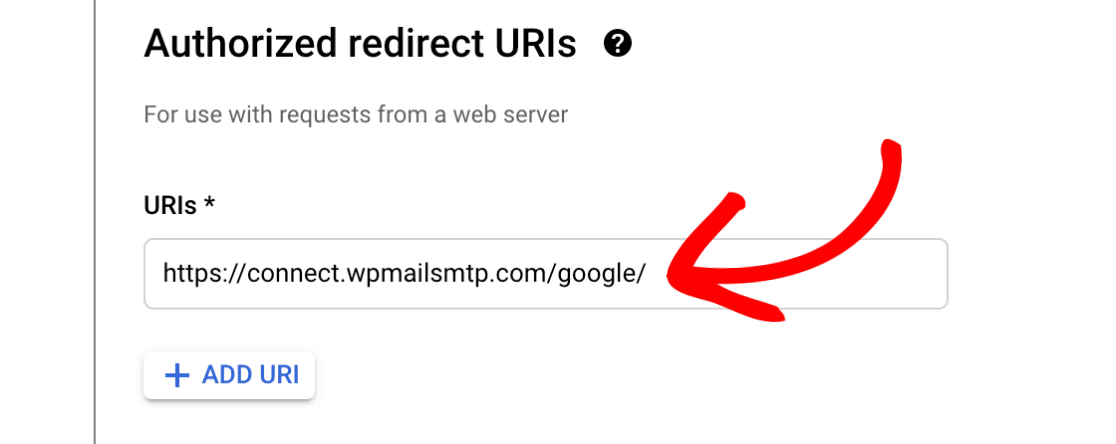
Next, skip the Authorized JavaScript origins section and scroll to Authorized redirect URIs.
Click on the + ADD URI button and input the following: https://connect.wpmailsmtp.com/google/. You can also copy this value from your WP Mail SMTP settings and paste it here if you prefer.
Then click on the CREATE button to complete this step.
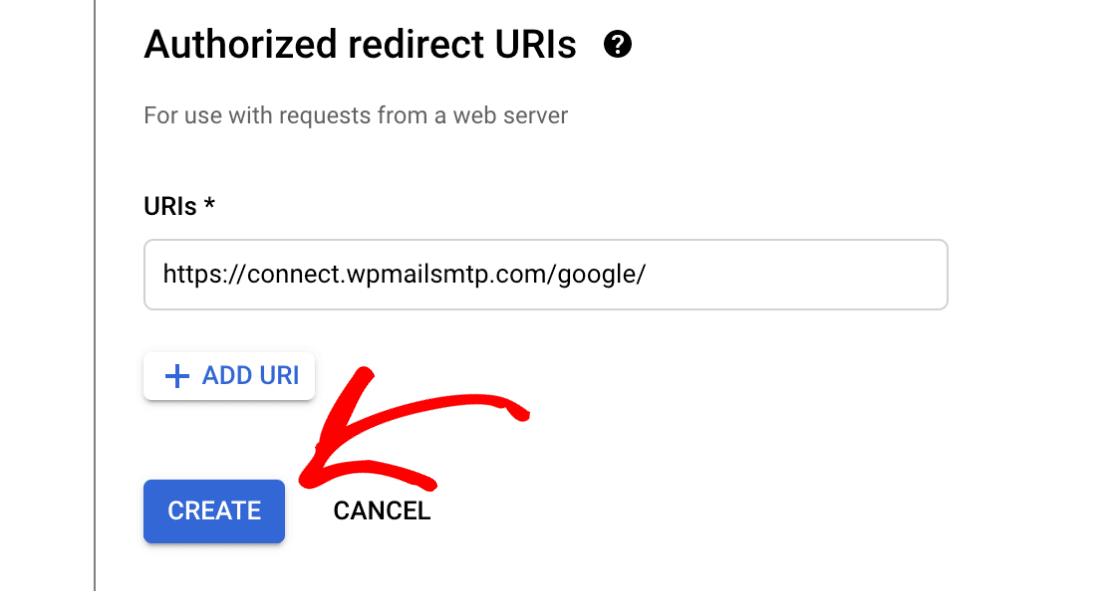
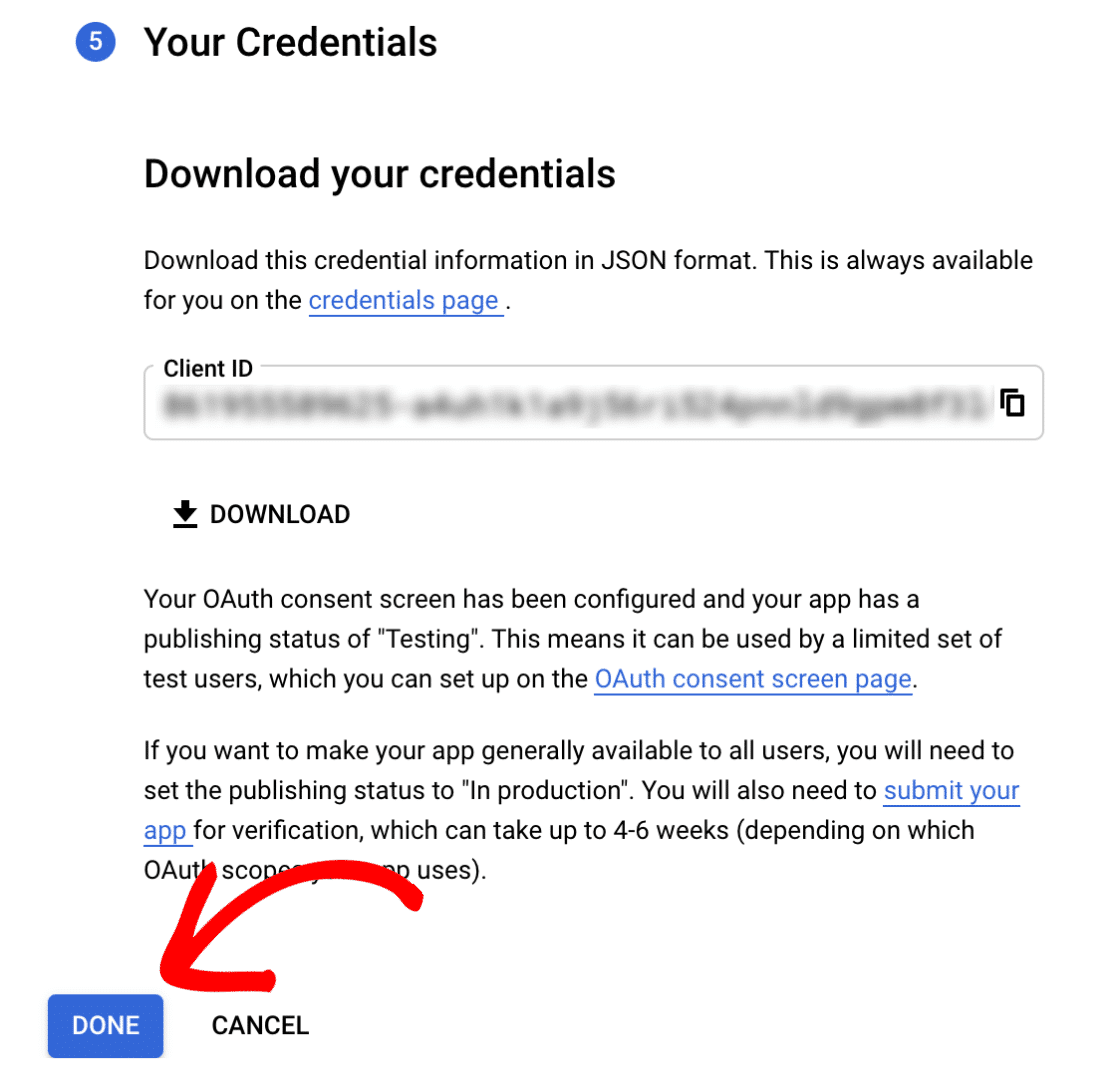
Once your app has been created, the Your Credentials section will expand to show you your Client ID. There’s no need to copy it now, as you’ll access it from another area in a later step. Instead, go ahead and click the DONE button at the bottom of the page.
Updating the Publishing Status From Testing to Production #
Google will put your app into Internal mode by default. It’s really important that you switch it to External mode and publish it. Otherwise, your app will be super limited and won’t function properly.
In your Google Cloud Console sidebar, go to APIs & Services » OAuth consent screen.
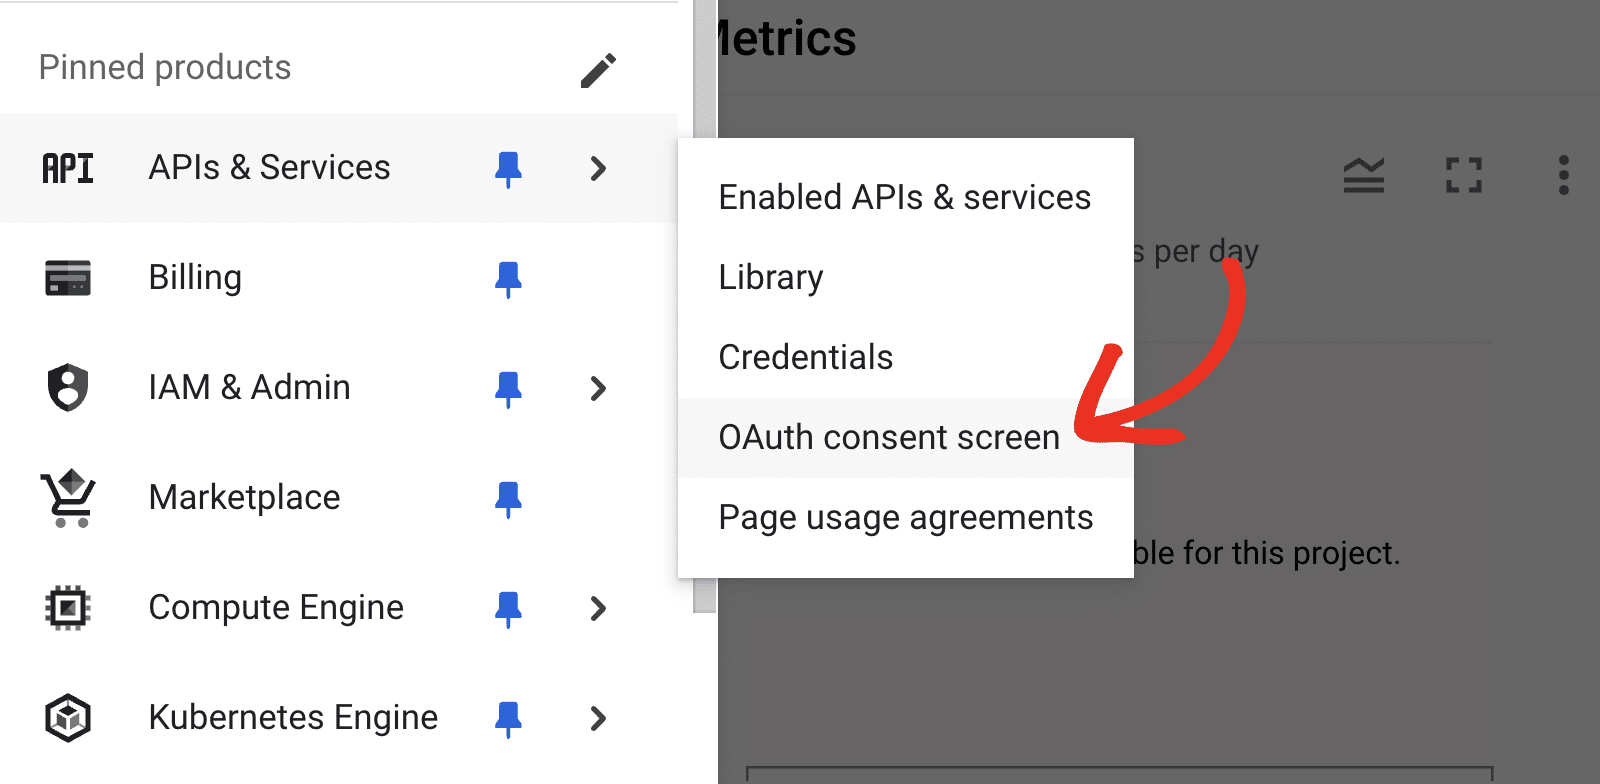
Then select the Audience tab.
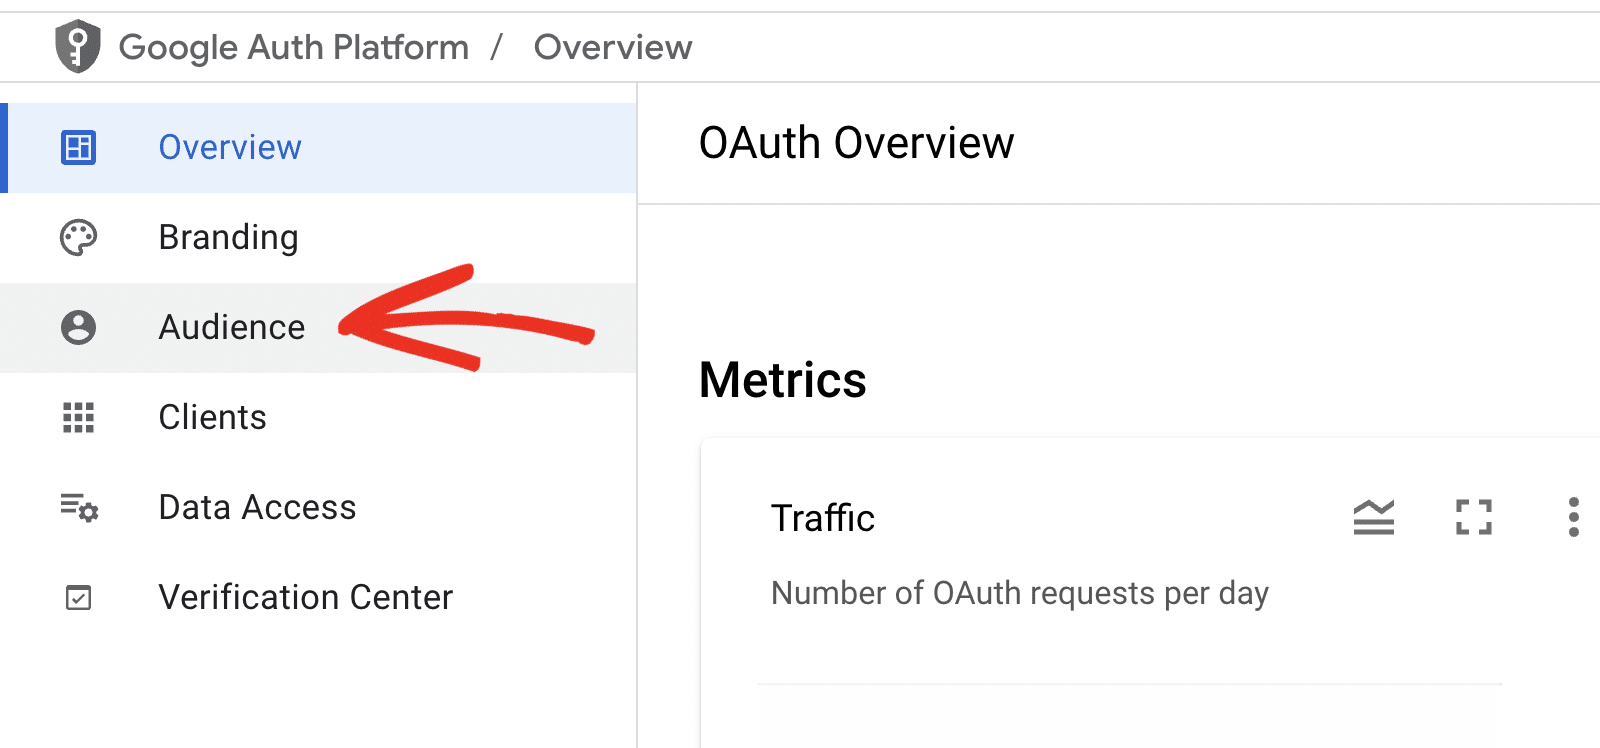
The exact screen you’ll see next will vary depending on whether you’re using a free Gmail account or a Google Workspace account.
Google Workspace Users #
Under User type, click on the MAKE EXTERNAL button.
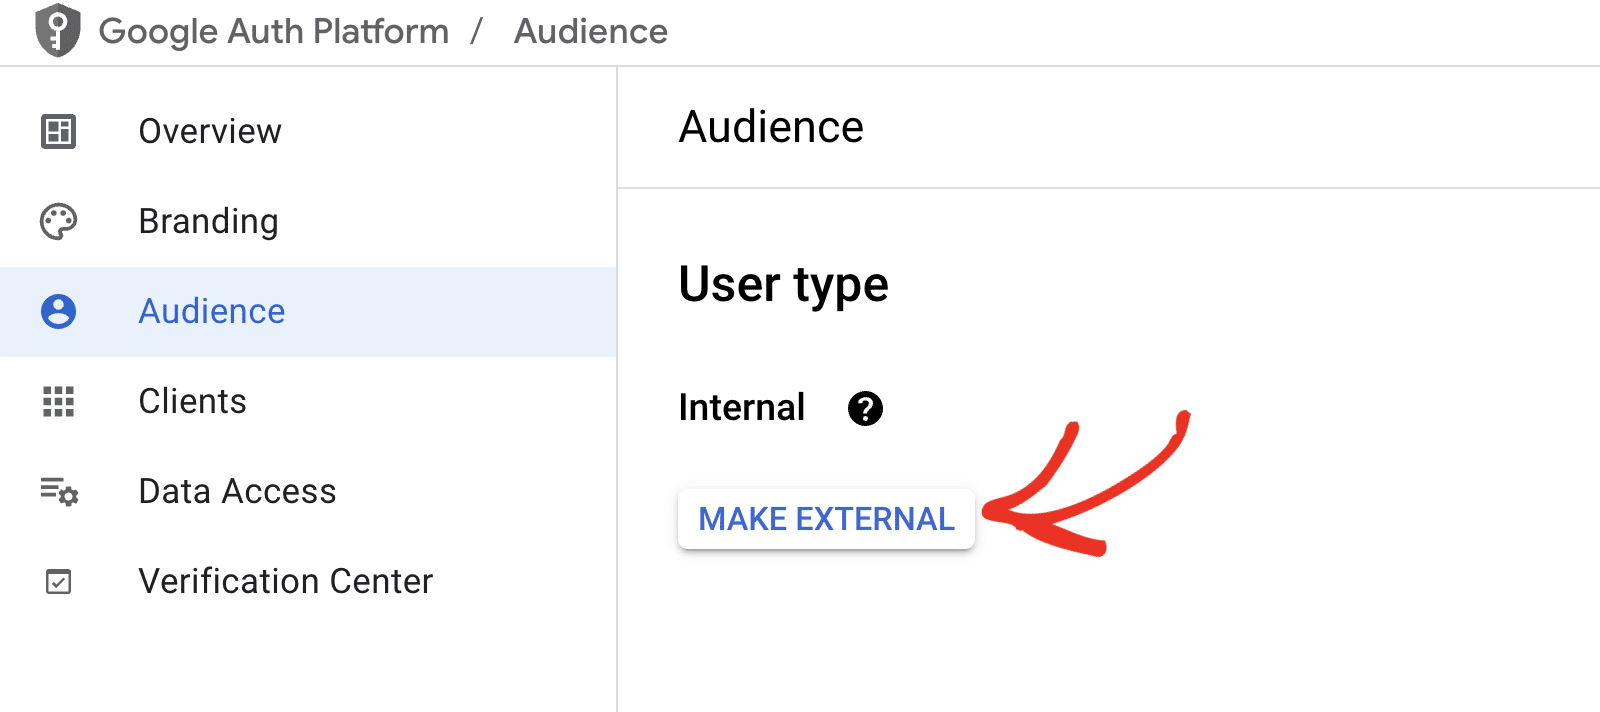
Note: Only users within your organization can access your app if the User type is set to Internal. For example, if your Workspace domain is example.com, users can only access your app using an @example.com email address.
External email addresses will see an error that reads Error 403: org_internal when granting WP Mail SMTP access to your app. In the popup window that appears, select the In production option. Then click on CONFIRM.

Gmail Users #
If you’re not using Google Workspace, you won’t see the MAKE EXTERNAL option. Instead, you’ll need to publish your Google app. Under Publishing status, you’ll see the app status is set to Testing. Go ahead and click the PUBLISH APP button to update your app status.

In the overlay that appears, click CONFIRM to publish your app.

Once confirmation is complete, you’ll see that your app’s Publishing status is now In production.

Granting Your Site Google / Gmail Permissions #
Next, navigate to APIs & Services » Credentials in the left side menu.
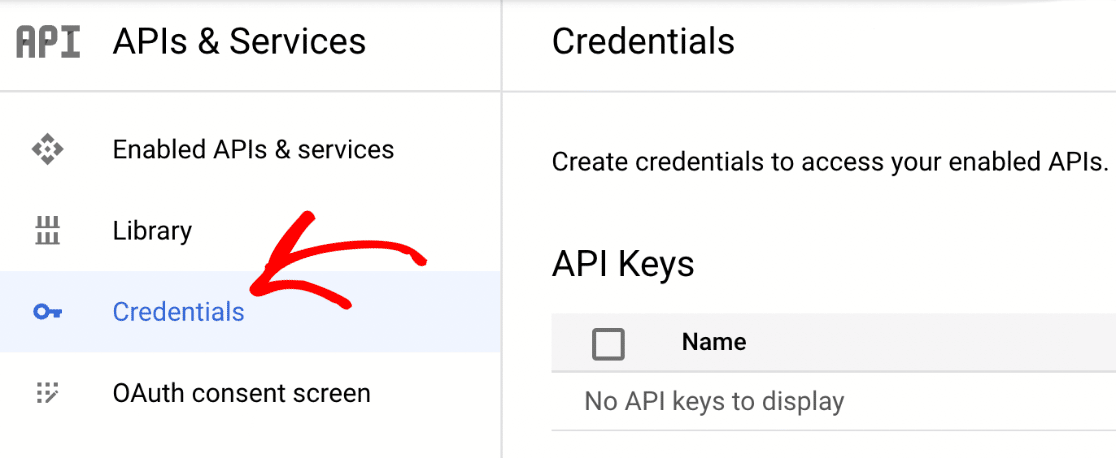
Once there, look under the OAuth 2.0 Client IDs section. You’ll see the details of the web application you just created. To view the Client ID and Client Secret, click the pencil icon.
This will open all of the details for your app. On the right side of this page, you’ll see the Client ID and Client secret values.
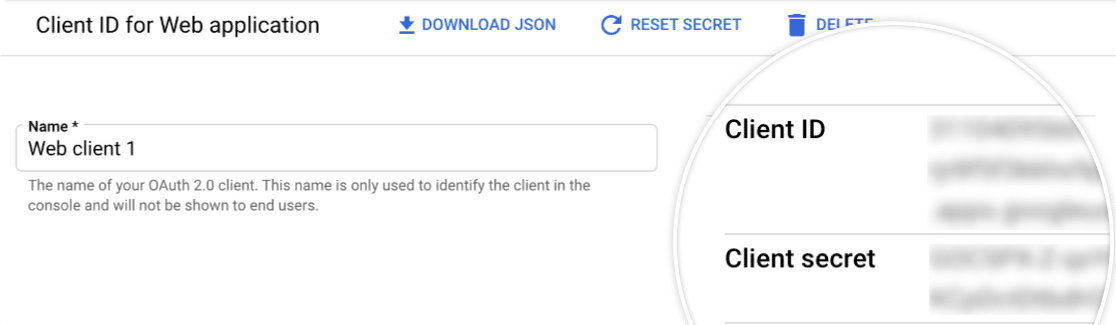
Go ahead and copy both of these values into the corresponding fields in your WP Mail SMTP settings.

Note: Be very careful not to copy any extra text or spaces with your Client ID or Client Secret, as this will result in an error in the next step.
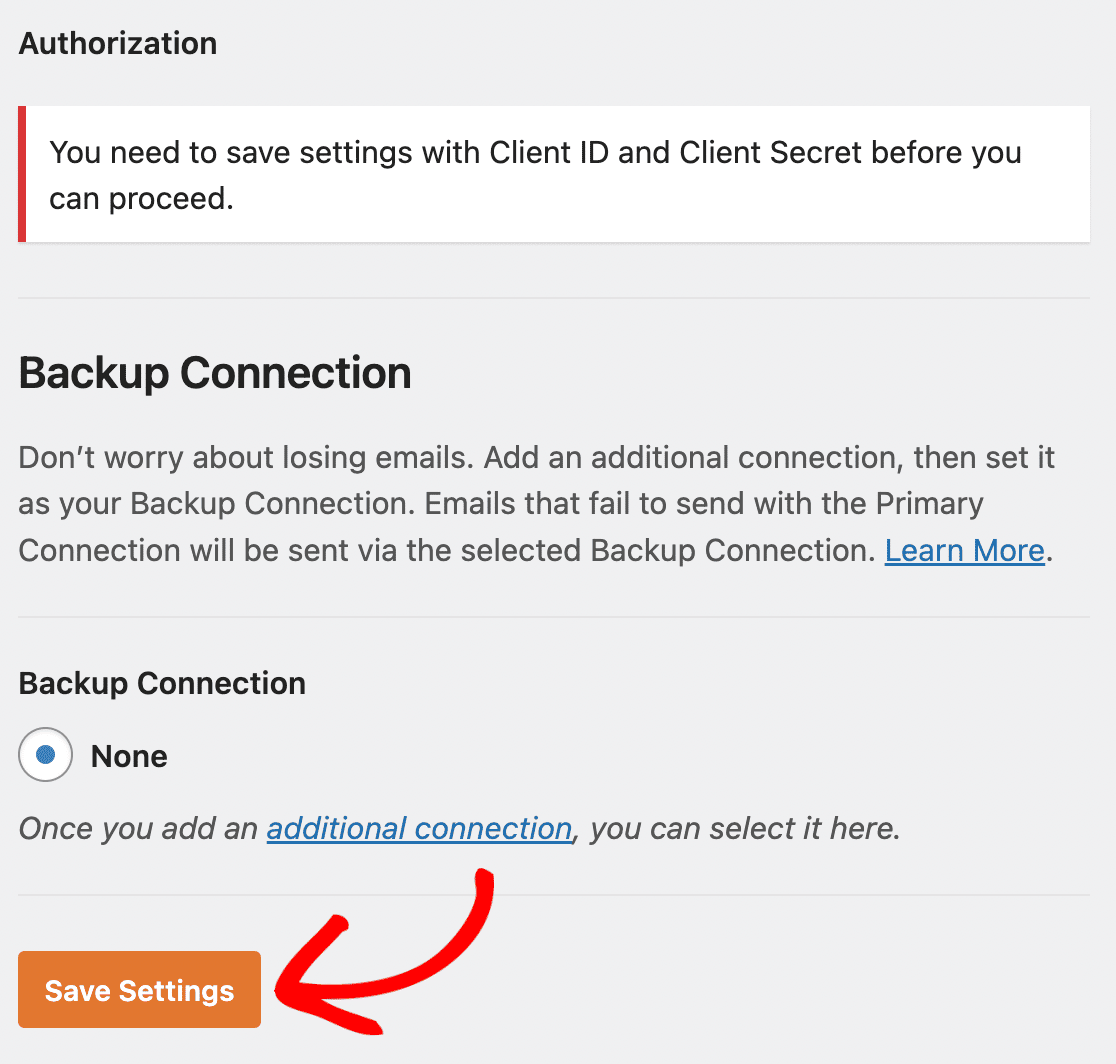
Once you’ve added these values, click the Save Settings button at the bottom of the page.
After saving your settings, the page will refresh. You must grant permission before Google allows our plugin to use your Gmail API to send emails. To do this, scroll to the bottom of the WP Mail SMTP settings page and click the button labeled Allow plugin to send emails using your Google account.

This will open a login screen for Google. Go ahead and log in to the account you’re setting up SMTP with. Next, you’ll see a screen asking for permission for this site to send emails on your behalf. When you’re ready, click the Allow button to proceed.

Bypassing Google’s Verification Warning (Free Gmail Users Only) #
You might see the following screen if you are connecting with a free Gmail account. Go ahead and click on the Advanced link in the bottom left corner.
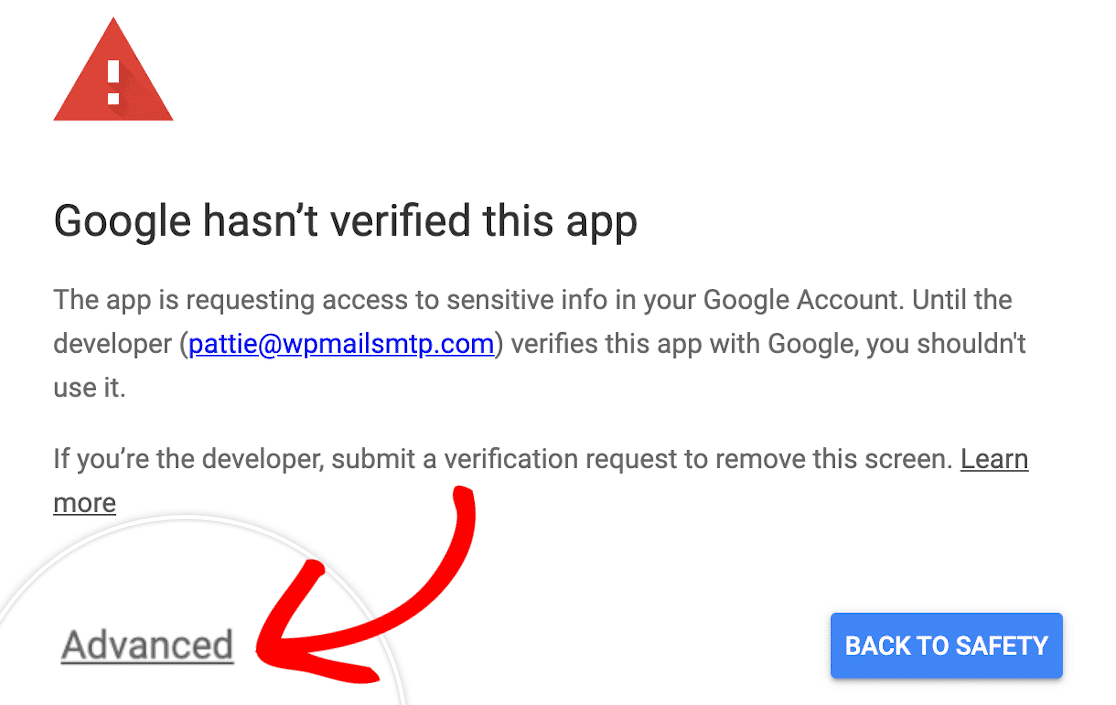
In the expanded section, click on Go to wpmailsmtp.com (unsafe). Don’t worry, Google only displays this warning because it hasn’t verified your app. There is no need to verify it since you created this app just for your own use.
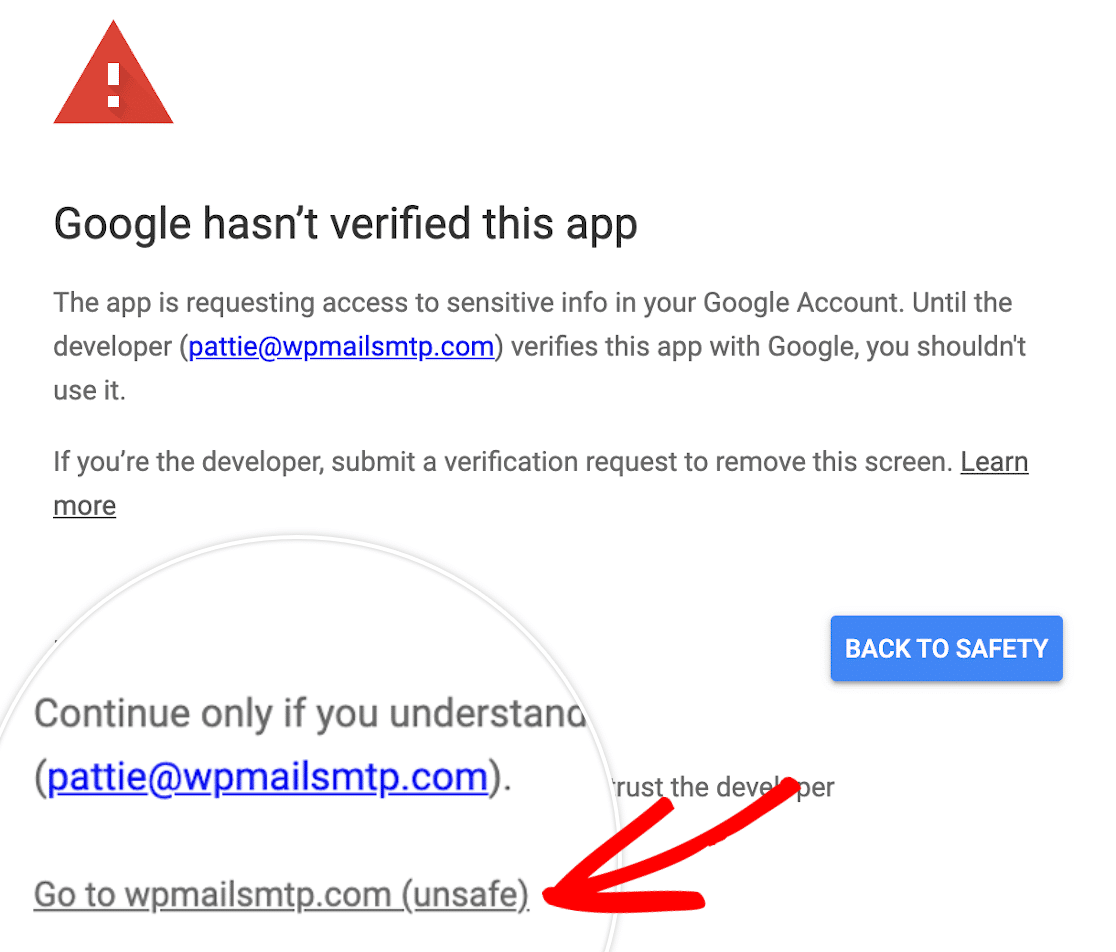
Then click on the Allow button as shown above.
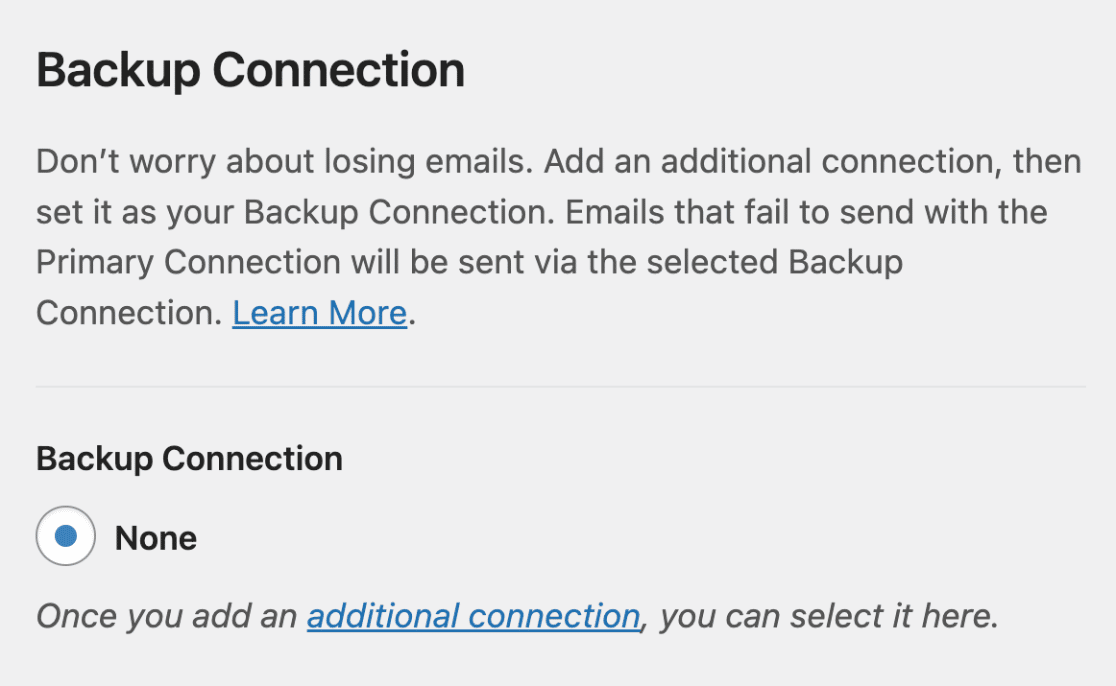
Backup Connection #
Setting up a Backup Connection is optional and isn’t required to complete your Google Workspace / Gmail mailer setup. However, to further improve email deliverability, we recommend configuring an additional connection to serve as a backup in case your Primary Connection fails.
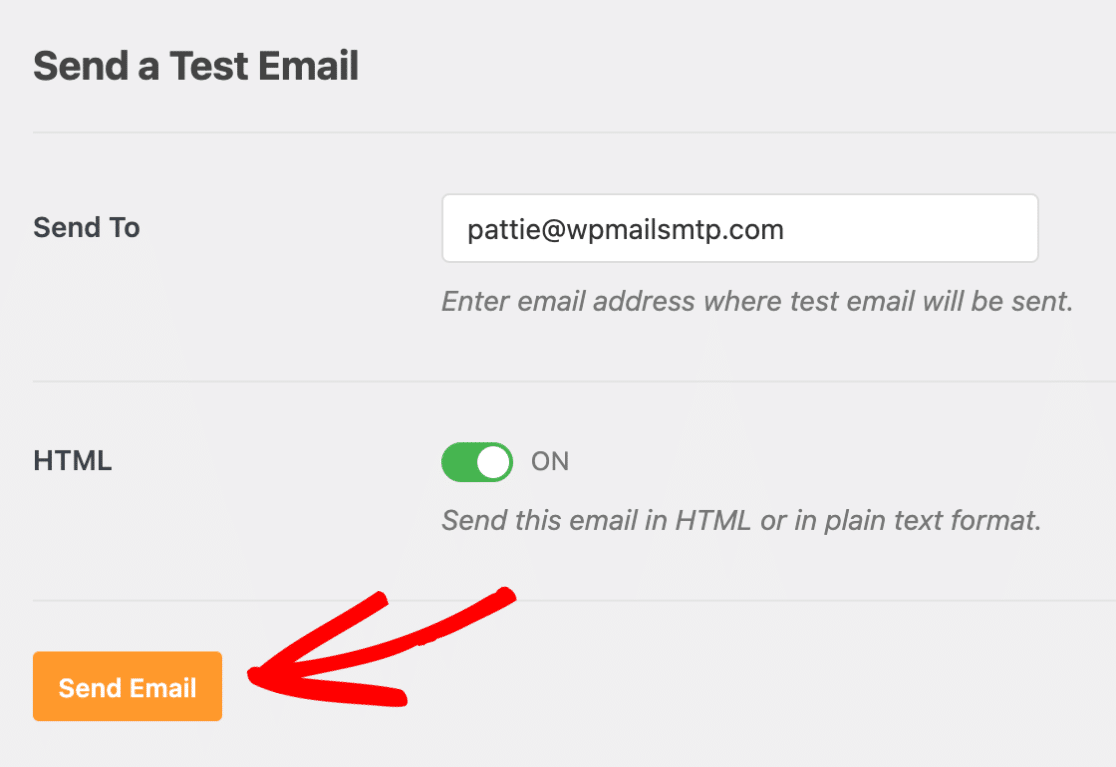
Sending a Test Email #
Next, you’ll be returned to your WP Mail SMTP settings, and a success message will be displayed. Once the connection is complete, you’re ready to send a test email. To do so, navigate to WP Mail SMTP » Tools and open up the Email Test tab.

Once the Email Test tab is open, you’ll need to enter an email address whose inbox you have access to.
Next, choose whether to send a plain text or HTML email. Unless you know you’ll only be sending plain text emails, we recommend leaving the HTML setting toggled ON. Then click the Send Email button.
12.How to Fix the Error Establishing a Database Connection in WordPress #
A database is software that makes it easy to store, organize, and retrieve data from other software.
As a content management system, WordPress uses a database to store all your content and other website data. It then connects to the database each time someone visits your website.
WordPress needs the following information for connecting to the database:
- Your database name
- Database username and password
- Database server
This information is stored in your WordPress configuration file, which is called wp-config.php.
If any of this information is incorrect, then WordPress will fail to connect to your database server, and you will see the ‘Error establishing a database connection’ error.

It is one of the most common WordPress errors. Apart from incorrect credentials, this error can also appear if the database server is down or the database files are corrupt.
how to fix the ‘Error establishing database connection’ issue in WordPress with step-by-step troubleshooting.
1. Check Your WordPress Database Credentials #
Incorrect credentials are the most common cause of the database connection error. If you recently moved your WordPress site to a new host, then this is likely the problem.
Your WordPress database credentials are stored in the wp-config.php file. It is the WordPress configuration file that contains important settings, including database information.
You will be looking for the following lines in the wp-config.php file:
// ** MySQL settings - You can get this info from your web host ** //
/** The name of the database for WordPress */
define( 'DB_NAME', 'database_name_here' );
/** MySQL database username */
define( 'DB_USER', 'username_here' );
/** MySQL database password */
define( 'DB_PASSWORD', 'password_here' );
/** MySQL hostname */
define( 'DB_HOST', 'localhost' );
You can confirm this information from your WordPress hosting account dashboard. For this tutorial, we will be using Bluehost, but the process will be similar for other hosting panels as well.
Upon logging in, click on the ‘Website’ tab in the left column and then switch to the ‘Advanced’ tab. Then, scroll down to the ‘Database’ section and click the ‘Manage’ button next to it.

This will open the MySQL Databases page in cPanel in a new window.
Here, you can find your database name and username in the ‘Current Database’ section. Keep in mind to copy and paste these details into a notepad so you can add them to the wp-config file.

Next, scroll down to the ‘Current Users’ section, where you can click on the ‘Change Password’ link next to your database name. This will take you to a new screen, where you can change the database password according to your liking.

Once you have confirmed all your database details, you can change that information in your wp-config.php file if needed.
After that, try visiting your website again to see if the database connection error has gone. If you can still see the error, then this means that something else is wrong.
2. Check Your Database Host Information #
If you are confident that your database name, username, and password information are accurate, then you will want to make sure you are using the correct database host information.
This means that you will need to contact your WordPress hosting company to confirm these details.
3. Repair WordPress Database #
Now, you may be getting a different error in the wp-admin dashboard, such as ‘One or more database tables are unavailable’ or ‘The database may need to be repaired.’ In that case, you need to repair your database.
You can do this by adding the following line in your wp-config.php file.
define('WP_ALLOW_REPAIR', true);Once you have done that, you can see the settings by visiting this page: http://www.yoursite.com/wp-admin/maint/repair.php. Just make sure to replace yoursite.com with your own domain name.
Here, you must click the ‘Repair Database’ button to start the process.

Note: The user does not need to be logged in to access the database repair page. Once you are done repairing and optimizing your database, make sure to remove this line to code from your wp-config.php. However, if you don’t want to add any code to your site, then you can also repair your database using your hosting account’s cPanel.
Go ahead and visit your hosting account, where you must open the ‘Websites’ page from the left column. Then, switch to the ‘Advanced’ tab and click the ‘Manage’ button in the Database section.
This will open cPanel in a new tab. Here, scroll down to the ‘Modify Databases’ section and choose your database’s name from the ‘Repair Database’ dropdown menu.
Once you do that, simply click the ‘Repair Database’ button to start the process.

The hosting panel will now automatically repair your database for you. Once the process is complete, you will also see a success message.

You can now visit your WordPress site to see if the error has been resolved or not.
4. Check If Your Database Server Is Down #
If everything seems to be correct, and WordPress still cannot connect to the database, then your database server (MySQL server) may be down. This could happen due to heavy traffic on a server. Your host server just cannot handle the load (especially when you are on shared hosting).
Additionally, if you have other websites running on the same server, then you can check those sites to confirm that your SQL server is down. If you do not have any other site on the same hosting account, then simply go to your hosting dashboard and switch to the ‘Advanced’ tab.
After that, click the ‘Manage’ button next to the phpMyAdmin section.

This will open phpMyAdmin in a new window, where you must click the ‘Database’ option at the top.
After that, click on your database’s name to access its settings. If you can do that, then it is time for you to check if your database user has sufficient permissions.

12.WordPress Memory Exhausted Error – Increase PHP Memory #
The WordPress memory exhausted error is a message you might see if your website is struggling to perform tasks. WordPress is built using PHP, a server-side programming language that needs memory to run.
Just like any other computer, web servers have a limited amount of memory to run multiple applications at the same time. WordPress hosting providers allocate specific memory sizes to different applications, including PHP.
When your WordPress code requires more memory than the default allocated memory, you will see this error message:
Fatal error: Allowed memory size of 33554432 bytes exhausted (tried to allocate 2348617 bytes) in /home4/xxx/public_html/wp-includes/plugin.php on line xxx

Your WordPress site may be exhausting its server memory if it has:
- A lot of images, videos, and other types of media
- Plenty of unused WordPress plugins
- Outgrown its hosting plan resources
By default, WordPress automatically tries to increase the PHP memory limit if it is less than 64MB. However, 64MB is often not high enough.
- Option 1: Editing the wp-config.php File
- Option 2: Editing the .htaccess File
- Option 3: Checking Your php.ini File
- Option 4: Upgrading Your WordPress Hosting
- How to Avoid Exhausting Your WordPress Memory
Option 1: Editing the wp-config.php File #
First, you need to edit the wp-config.php file on your WordPress site. This is one of the core WordPress files located in the root directory, usually named public_html.
You will need to use an FTP client like FileZilla or file manager in your web hosting control panel.
Next, you need to paste the following line in the wp-config.php file
define( 'WP_MEMORY_LIMIT', '256M' ); //This code tells WordPress to increase the PHP memory limit to 256MB.
Option 2: Editing the .htaccess File #
The next method is to edit the .htaccess file. This file is also located in the WordPress website’s root folder.
Here, you need to paste the following code before the line that says #END WORDPRESS
php_value memory_limit 256M
Option 3: Checking Your php.ini File #
If the above methods don’t work, you may want to look at your php.ini file.
php.ini is a file that controls your PHP settings, including the PHP version and PHP scripts. It’s not a WordPress core file, as your hosting provider usually manages it. You can check its code to see your PHP memory usage limit. For more details, you can see our guide on how to find and edit the php.ini file.
Option 4: Upgrading Your WordPress Hosting #
If you constantly encounter the memory exhausted error, it might be a sign that your website has outgrown its current hosting plan.
As your website attracts more visitors and adds more content, it requires more resources to function smoothly. Upgrading a plan with a higher memory allocation can be a permanent solution.